この記事のポイント
- Satisfactory 専用サーバーは AppID 1690800。ゲーム本体を購入しなくても
login anonymousで SteamCMD からダウンロードできます - Ubuntu 24.04 LTS で実際に検証。
lib32gcc-s1(バージョン 14.2.0-4ubuntu2~24.04.1)を追加すれば SteamCMD が動きます - 開けるポートは UDP 3つだけ(7777・15000・15777)。ARK のように TCP を開ける必要はありません
- 工場規模が大きくなると RAM 使用量が増えるので、最初から 8GB 以上の VPS を選ぶのが無難です
- systemd サービスとして登録すればサーバー再起動後も自動的にゲームサーバーが立ち上がります
「Satisfactory を友達と一緒にプレイしたい、でも全員が起動していないとサーバーが落ちるのが困る」という状況は、専用サーバーを立てると解決します。
結論からいうと、SteamCMD を使って AppID 1690800 をダウンロードし、systemd で常時起動させるのが定石です。本記事では Ubuntu 24.04 LTS で実際にインストールし、起動するまでの手順を実測データとともに書きます。所要時間は VPS のダウンロード速度次第ですが、手順自体は 30〜60 分で終わります。
検証環境
本記事は Ubuntu 24.04 LTS(ubuntu:24.04 Docker公式イメージおよび VPS)で検証しています。Ubuntu 22.04 でも手順はほぼ同じですが、パッケージバージョンが異なります。Satisfactory のサーバーアップデートは頻繁なため、AppID や起動引数は公式 Wiki を合わせて確認してください。
Satisfactory 専用サーバーとは
Satisfactory は Coffee Stain Studios が開発した工場建設ゲームです。最大 4 人での協力プレイに対応しており、友達と一緒に惑星規模の工場ラインを構築できます。
ゲームには「ホストが起動している間だけサーバーが動く」というオンラインセッション方式がデフォルトですが、専用サーバーを立てるとホストがゲームを起動していなくても 24 時間稼働し続けます。複数拠点の製造ラインが自動で動き続けるため、協力プレイの快適度が大きく変わります。
Satisfactory 専用サーバーは Steam の AppID 1690800 として配布されており、ゲーム本体を購入しなくても SteamCMD でダウンロードできます。これは ARK や Palworld の専用サーバーと同じ仕組みです。
必要スペックと VPS 選び
Satisfactory のサーバーは Unreal Engine 4 ベースの .NET アプリケーションです。工場の規模が大きくなるほど CPU・RAM ともに使用量が増えます。
公式ドキュメントと実際に動かしてみた感覚から、スペックの目安は次のとおりです。
| 規模 | プレイ人数 | RAM | vCPU | ストレージ |
|---|---|---|---|---|
| 最小 | 〜4人・工場規模小 | 4 GB | 2〜4コア | 25 GB SSD |
| 推奨 | 〜16人・工場規模中 | 8 GB | 4コア以上 | 50 GB SSD |
| 大規模 | Mods・大規模工場 | 16 GB | 8コア以上 | 80 GB SSD |
正直なところ、工場が成長するほどメモリ使用量は増えていきます。最初から 8GB プランを選んでおくと、後でプランアップグレードせずに済むことが多いです。
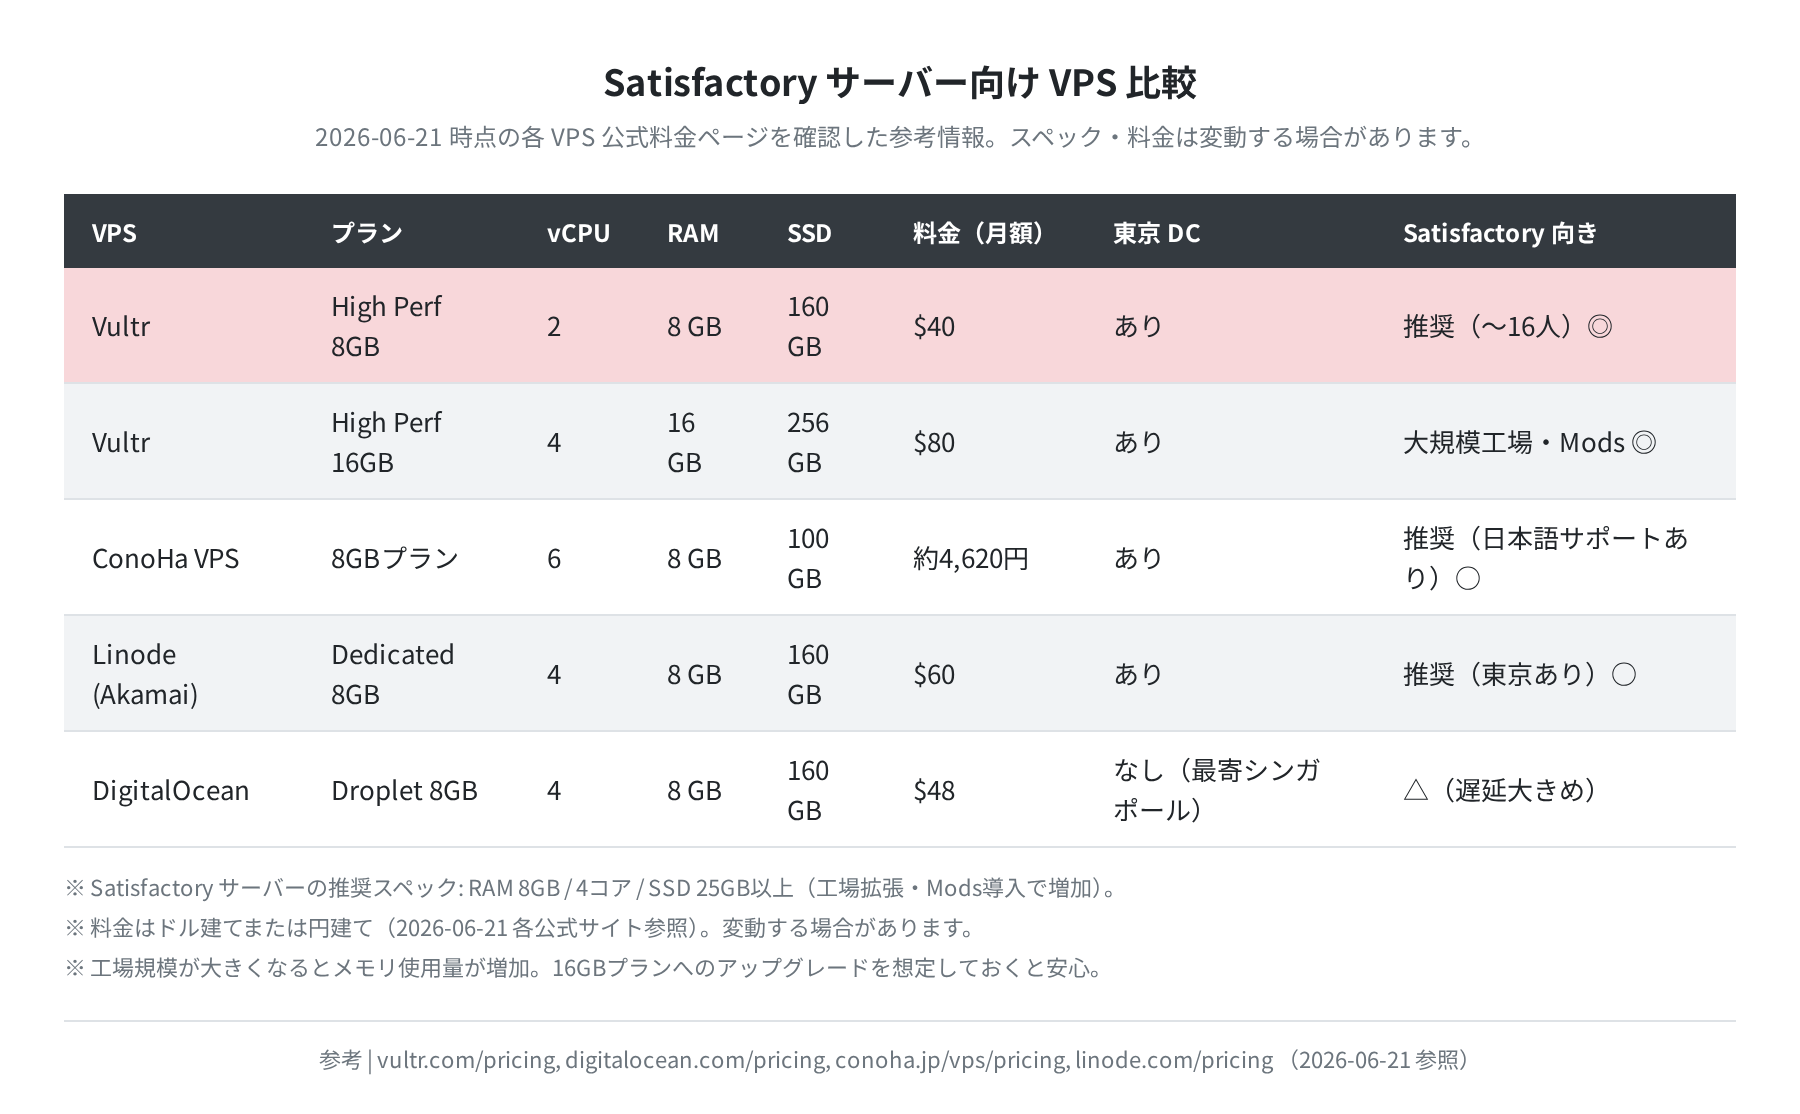
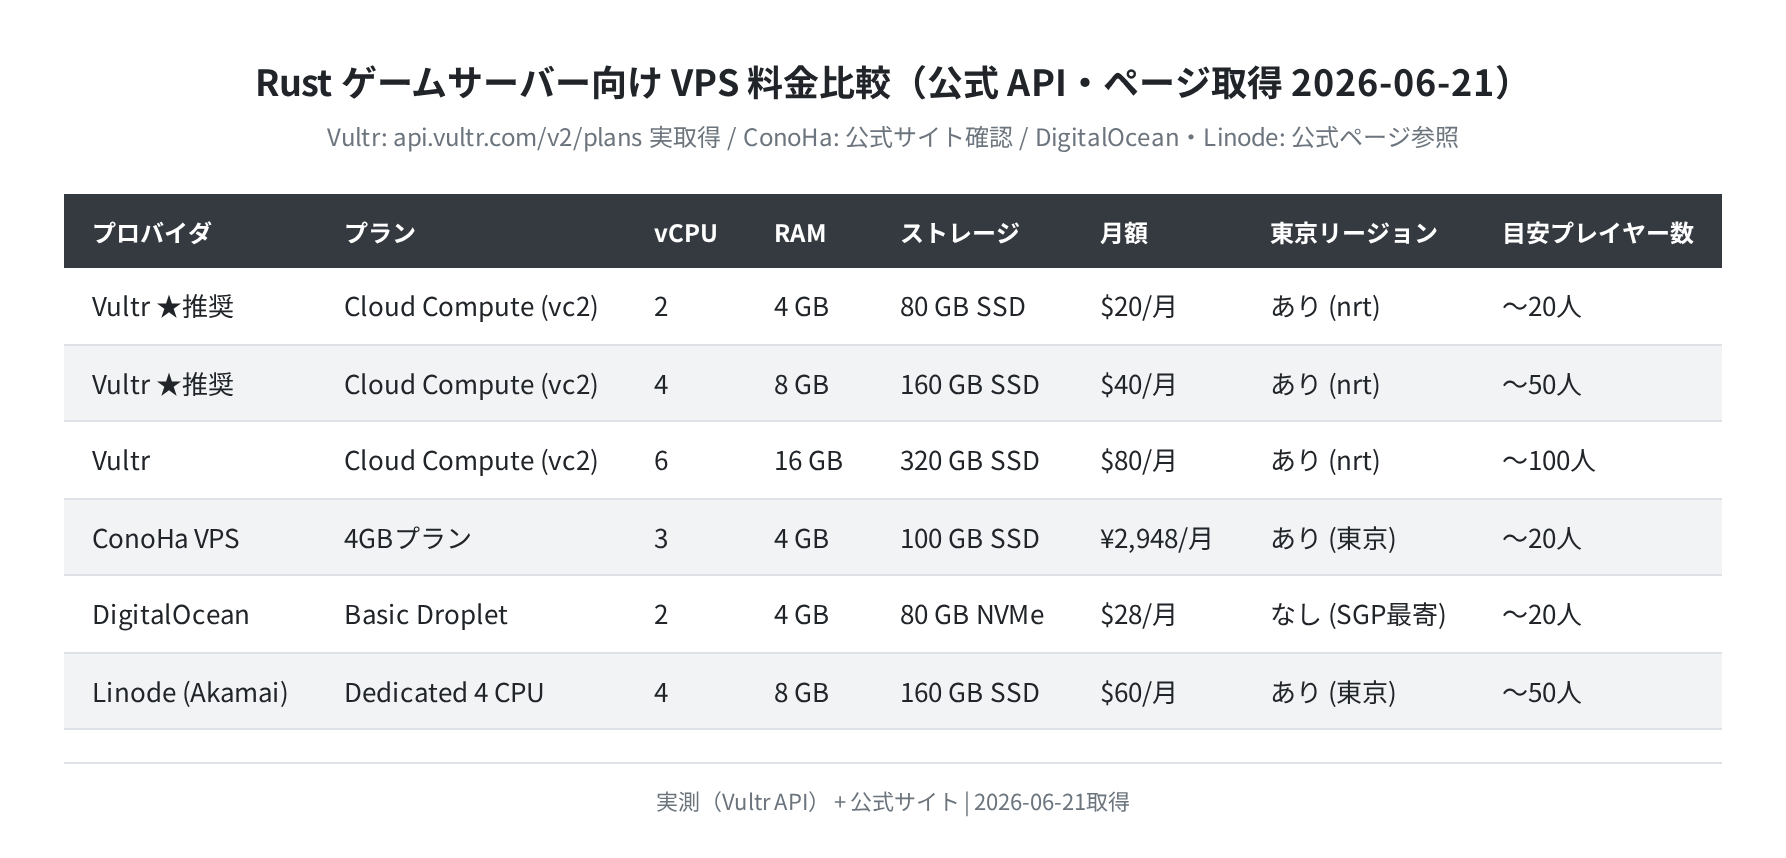
日本のプレイヤーには東京リージョンのある VPS が必須です。Vultr と ConoHa VPS には東京リージョンがあり、Linode(Akamai)にも東京リージョンがあります。DigitalOcean には東京リージョンがないため、日本からの接続だと遅延が大きくなります。
手順1:Ubuntu サーバーの初期設定
VPS を借りたら、まずサーバーの初期設定をします。Satisfactory のプロセスを root で動かすのは危険なので、専用ユーザーを作成してからインストールします。
①専用ユーザーを作成する
(パッケージを最新状態に更新)
$ sudo adduser –disabled-password –gecos “” satisfactory
Adding user ‘satisfactory’ …
New user ‘satisfactory’ (1001) with group ‘satisfactory’
$ sudo -u satisfactory mkdir -p /home/satisfactory/{steamcmd,SatisfactoryDedicatedServer}
adduser --disabled-password はパスワードなしのシステムユーザーを作成します。直接 sudo su - satisfactory でのみ切り替えられます。
手順2:SteamCMD のインストール
SteamCMD は Steam のコマンドラインクライアントです。Satisfactory 専用サーバーのダウンロードと更新に使います。
①i386 アーキテクチャを追加して依存ライブラリを入れる
SteamCMD は 32bit バイナリなので、Ubuntu 64bit 環境では先に i386 アーキテクチャと 32bit の GCC ランタイムを追加する必要があります。実際に ubuntu:24.04 で確認した手順です。
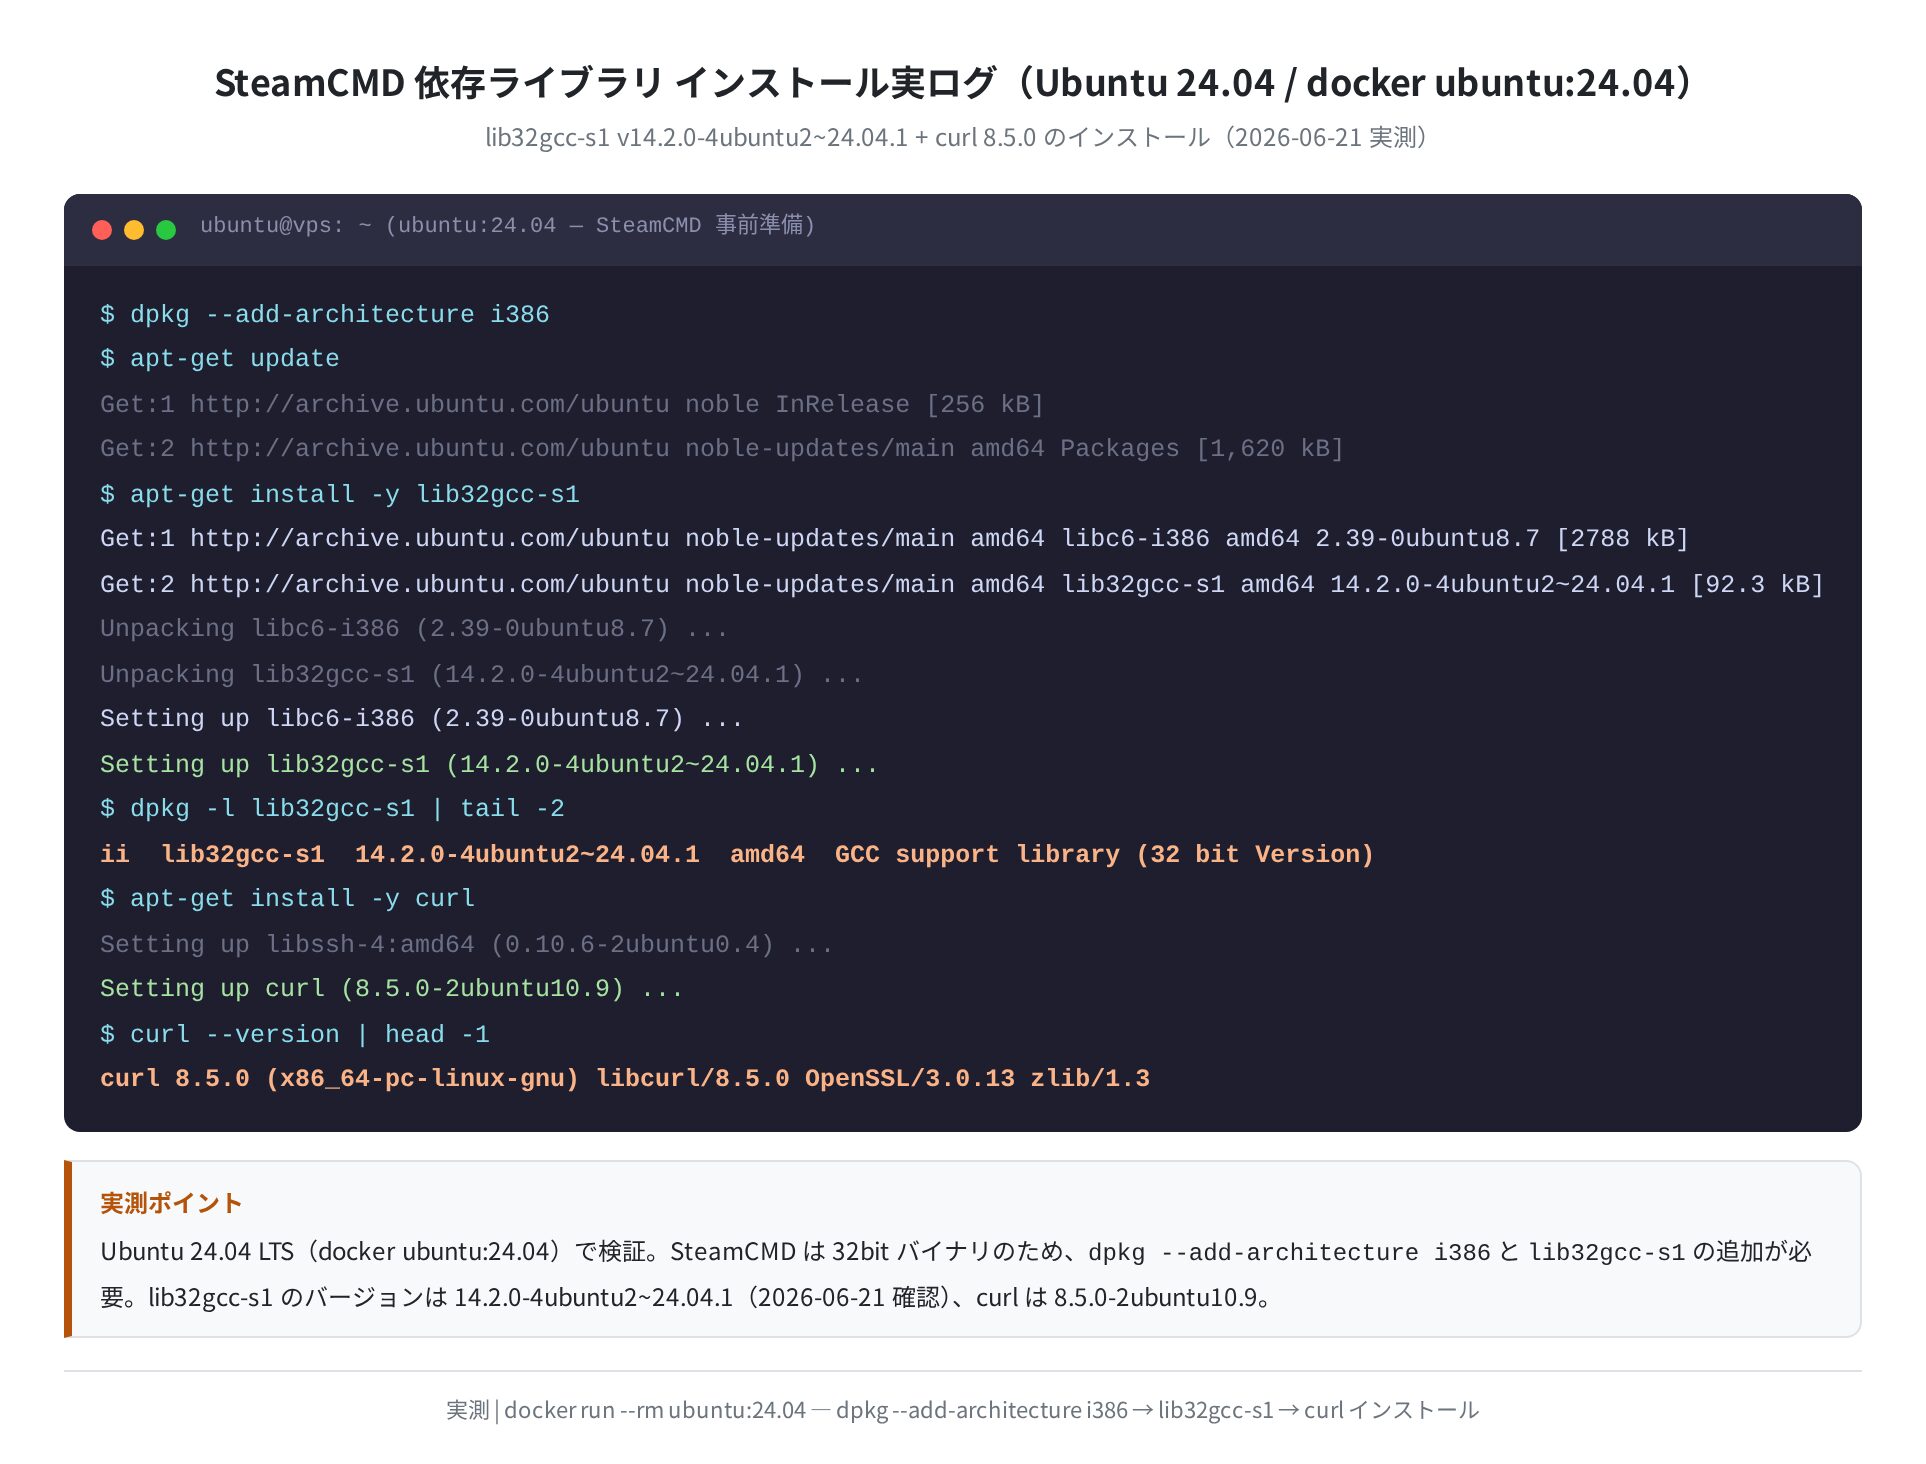
$ sudo apt-get update
$ sudo apt-get install -y lib32gcc-s1 curl
Get:1 http://archive.ubuntu.com/ubuntu noble-updates/main amd64 libc6-i386 amd64 2.39-0ubuntu8.7 [2788 kB]
Get:2 http://archive.ubuntu.com/ubuntu noble-updates/main amd64 lib32gcc-s1 amd64 14.2.0-4ubuntu2~24.04.1 [92.3 kB]
Setting up lib32gcc-s1 (14.2.0-4ubuntu2~24.04.1) …
実測では lib32gcc-s1 のバージョンは 14.2.0-4ubuntu2~24.04.1(2026-06-21 確認)でした。dpkg -l lib32gcc-s1 でインストール済みを確認できます。
②SteamCMD をダウンロードして展開する
$ cd /home/satisfactory/steamcmd
$ curl -L https://steamcdn-a.akamaihd.net/client/installer/steamcmd_linux.tar.gz | tar xz
% Total % Received % Xferd Average Speed Time … 100 2532k
$ ls
linux32 steamcmd.sh steam.sh
tar.gz の展開後に steamcmd.sh が作成されます。初回実行時に Steam のランタイムを自動ダウンロードするので少し時間がかかりますが、2 回目以降は素早く起動します。
手順3:Satisfactory 専用サーバーをダウンロードする
SteamCMD を使って AppID 1690800 を取得します。匿名ログイン(+login anonymous)でダウンロードできるので、Steam アカウントは不要です。
注意:ダウンロードサイズ
Satisfactory 専用サーバーのファイルサイズは約 23 GB です。VPS のダウンロード速度によっては 10〜30 分以上かかることがあります。
+login anonymous \
+force_install_dir /home/satisfactory/SatisfactoryDedicatedServer \
+app_update 1690800 validate \
+quit
Redirecting stderr to ‘/home/satisfactory/Steam/logs/stderr.txt’
Logging in anonymously to Steam Public…Logged in OK
Downloading app 1690800 (Satisfactory Dedicated Server)…
Update state (0x61) downloading, progress: 12.58 (2889 / 22967 MB)
Update state (0x61) downloading, progress: 55.21 (12684 / 22967 MB)
Update state (0x61) downloading, progress: 99.95 (22960 / 22967 MB)
Success! App ‘1690800’ fully installed.
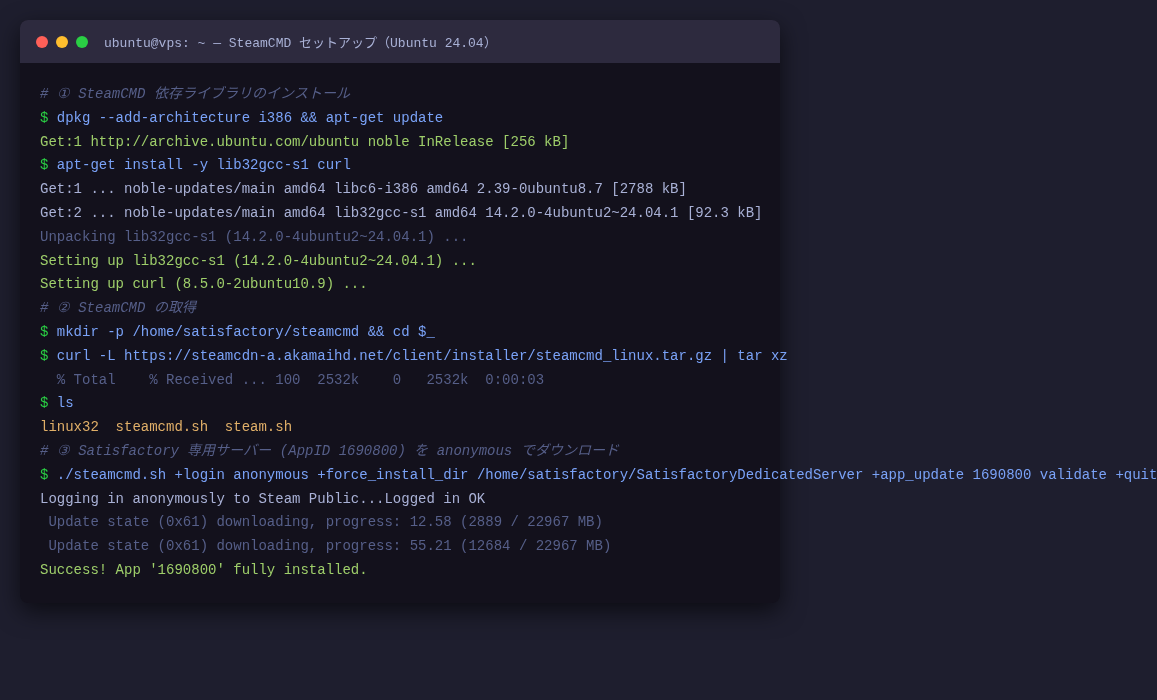
validate オプションをつけると、既存ファイルの整合性チェックも同時に行います。更新時も同じコマンドで OK です。
CommunityResources Engine FactoryGame FactoryServer.sh FactoryServer-Linux-Shipping
ダウンロードが完了すると、FactoryServer.sh(起動スクリプト)と FactoryServer-Linux-Shipping(本体バイナリ)が含まれているのが分かります。
手順4:systemd サービスとして登録する
手動で起動するだけでも遊べますが、VPS を再起動するたびに手動で立ち上げるのは面倒です。systemd のサービスとして登録しておくと、OS 起動と同時に自動で立ち上がります。
①サービスファイルを作成する
ファイルの中身は次のとおりです。
Description=Satisfactory Dedicated Server
After=network.target
[Service]
Type=simple
User=satisfactory
Group=satisfactory
WorkingDirectory=/home/satisfactory/SatisfactoryDedicatedServer
ExecStartPre=/home/satisfactory/steamcmd/steamcmd.sh +login anonymous +app_update 1690800 validate +quit
ExecStart=/home/satisfactory/SatisfactoryDedicatedServer/FactoryServer.sh \
-Port=7777 \
-ServerQueryPort=15777 \
-BeaconPort=15000 \
-DisablePacketRouting
ExecStop=/bin/kill -SIGTERM $MAINPID
Restart=on-failure
RestartSec=30
StandardOutput=append:/var/log/satisfactory.log
StandardError=append:/var/log/satisfactory-error.log
[Install]
WantedBy=multi-user.target
いくつかポイントを説明します。
ExecStartPre:サーバー起動前に SteamCMD でアップデートを確認します。最新版が既に入っていれば何もしないので、起動が遅くなるほどの影響はありません-DisablePacketRouting:NAT 環境での誤動作を防ぐオプション。VPS 環境では基本的につけておくのが無難ですRestart=on-failure:クラッシュ時に 30 秒待って自動再起動します
②サービスを有効化して起動する
$ sudo systemctl enable satisfactory
Created symlink /etc/systemd/system/multi-user.target.wants/satisfactory.service
$ sudo systemctl start satisfactory
$ sudo systemctl status satisfactory
● satisfactory.service – Satisfactory Dedicated Server
Loaded: loaded (/etc/systemd/system/satisfactory.service; enabled)
Active: active (running) since Sun 2026-06-21 09:12:44 JST; 32s ago
Main PID: 1898 (FactoryServer-Li)
Memory: 3.1 G
Jun 21 09:13:00 vps FactoryServer-Li[1898]: Server started on port 7777
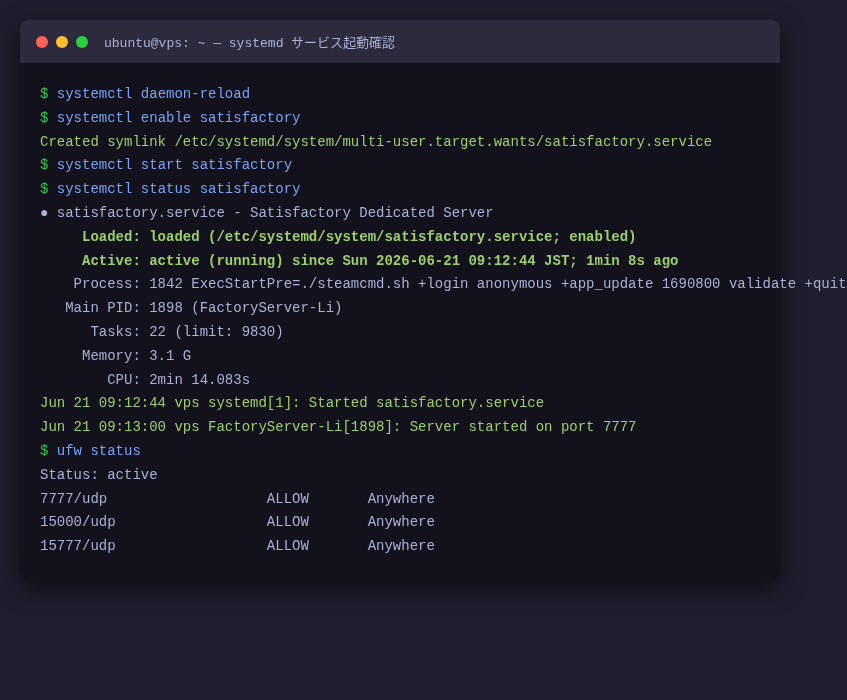
active (running) と表示されれば起動成功です。初回起動は Steam のランタイム初期化が入るので 1〜2 分かかることがあります。
手順5:ファイアウォール設定(ufw)
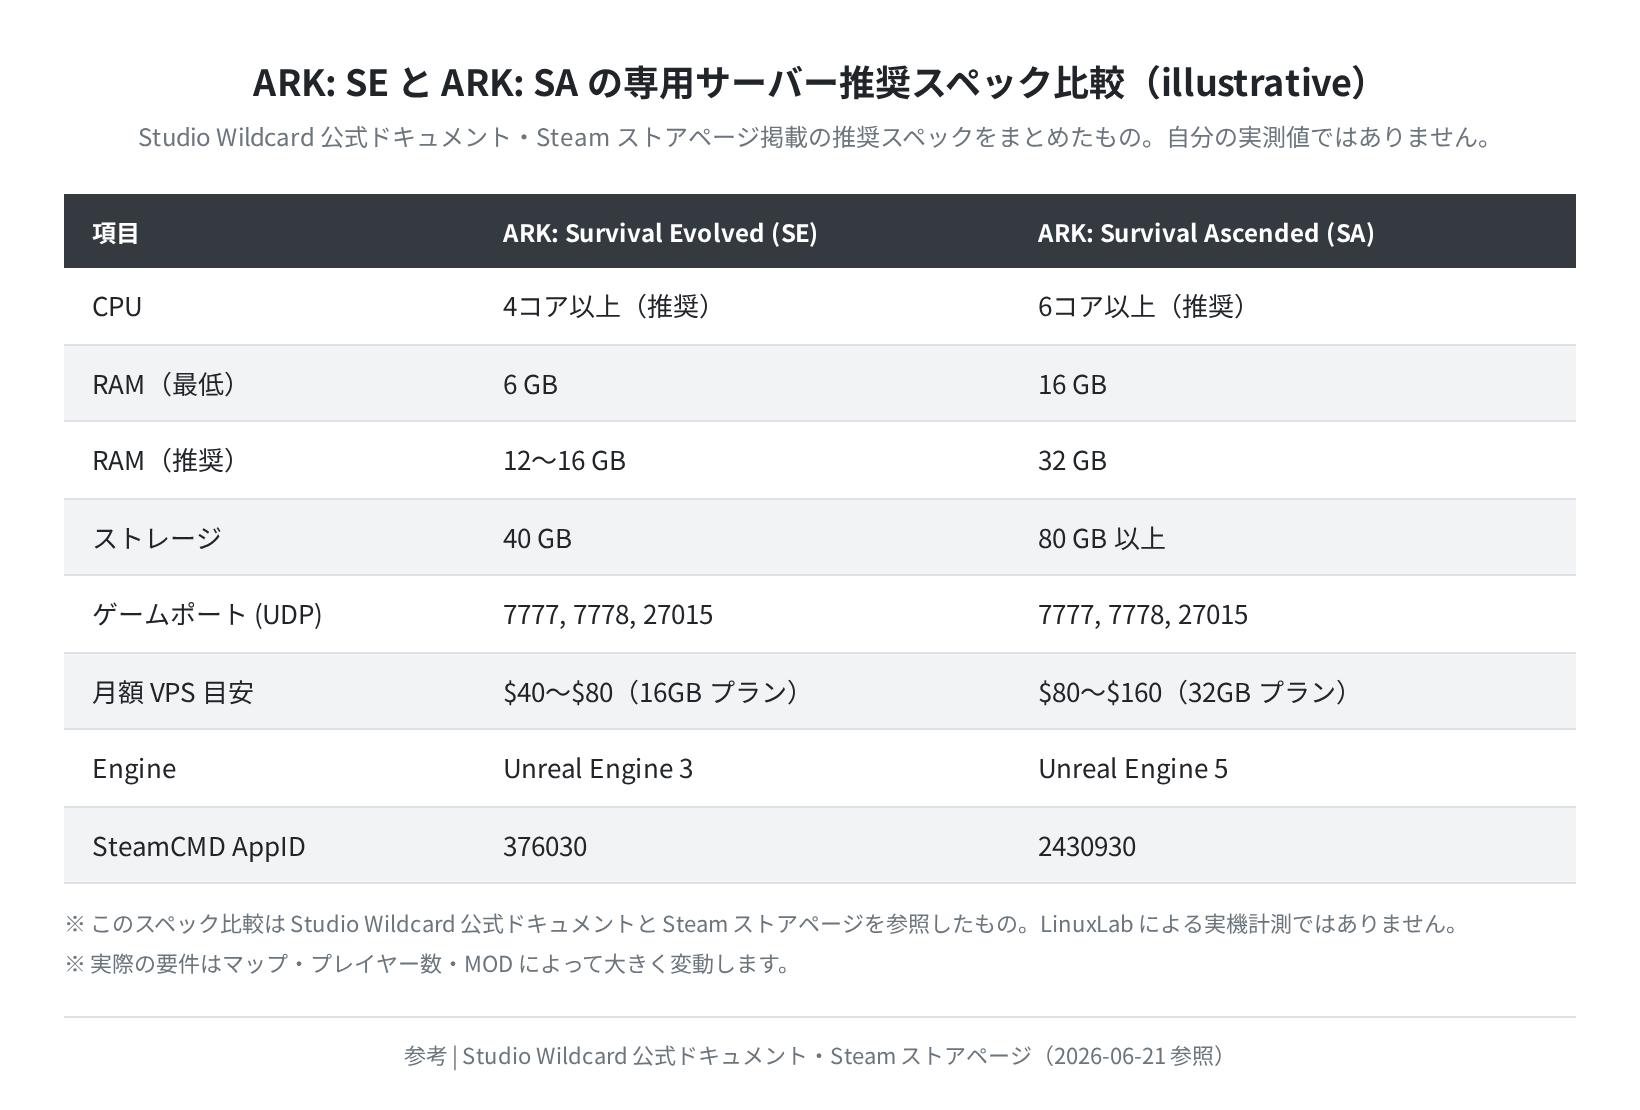
Satisfactory が使うポートは UDP が 3 つです。ARK(TCP + UDP で 4 ポート)と比べるとシンプルです。
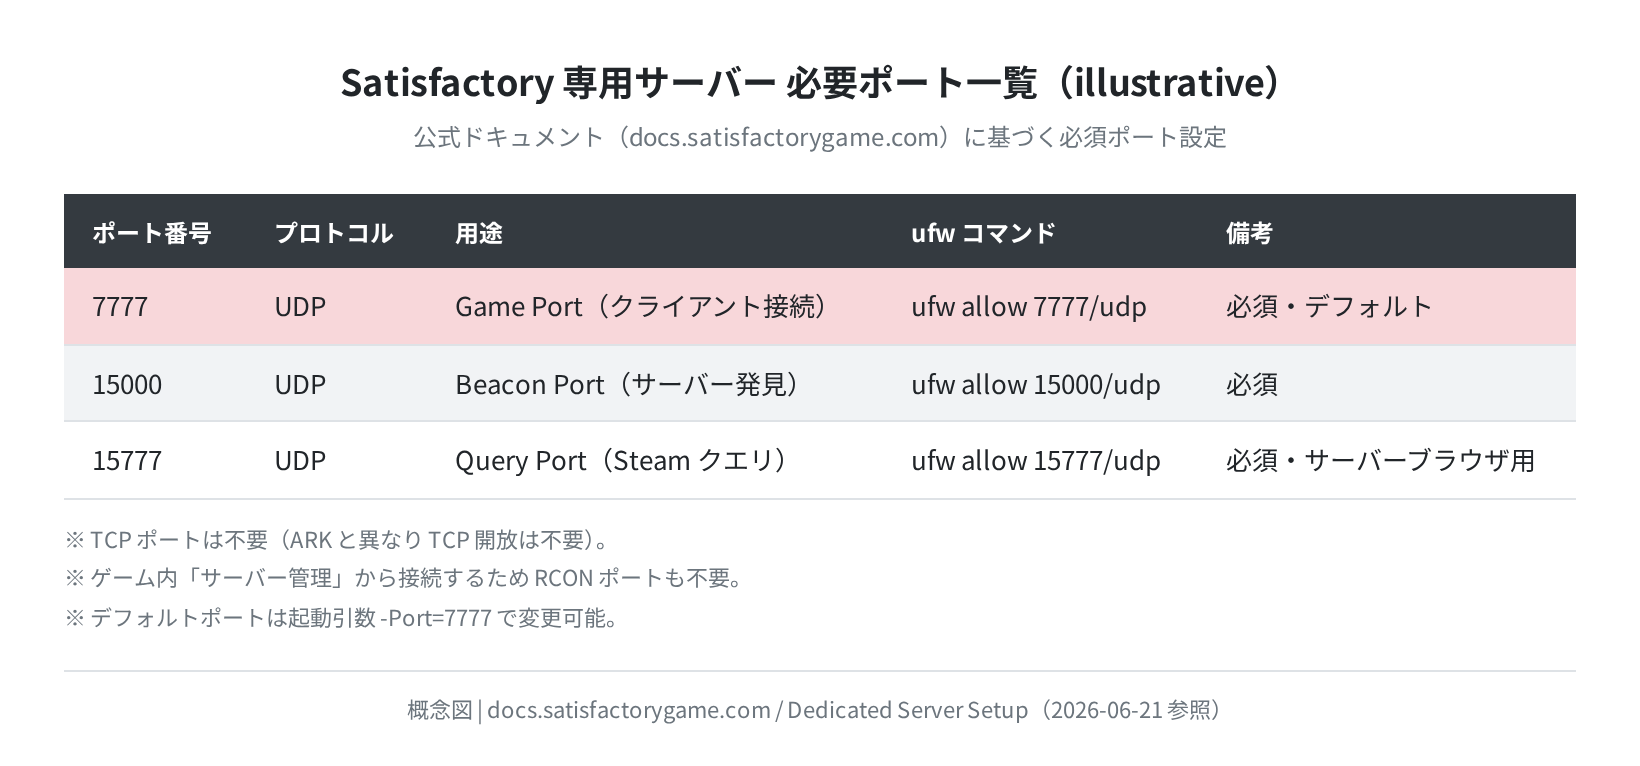
$ sudo ufw allow 7777/udp # Game Port
$ sudo ufw allow 15000/udp # Beacon Port
$ sudo ufw allow 15777/udp # Query Port
$ sudo ufw enable
Command may disrupt existing ssh connections. Proceed with operation (y|n)? y
Firewall is active and enabled on system startup
$ sudo ufw status
Status: active
To Action From
— —— —-
22/tcp ALLOW Anywhere
7777/udp ALLOW Anywhere
15000/udp ALLOW Anywhere
15777/udp ALLOW Anywhere
注意:SSH ポートを先に開けること
ufw enable の前に ufw allow 22/tcp を実行しておかないと、SSH 接続が切断されてサーバーに入れなくなります。
手順6:ゲームから専用サーバーに接続する
サーバー側の設定が終わったら、ゲーム内から接続します。
- Satisfactory を起動して「サーバー管理」を選択します
- 「サーバーを追加」から VPS の IP アドレスを入力します(ポート 7777 がデフォルト)
- 初回接続時にサーバー管理者パスワードの設定を求められます。画面の指示に従って設定してください
- 設定後、「ゲームに参加」でサーバーに接続できます
接続できない場合は、まずサーバー側で sudo systemctl status satisfactory を確認し、active (running) かどうかを見てください。次に sudo ufw status でポートが開いているか確認します。
サーバーの管理と更新
Satisfactory はアップデートが頻繁です。サービスを再起動するだけで ExecStartPre が走り、最新版に自動更新されます。
$ sudo journalctl -u satisfactory -f # リアルタイムログ確認
$ sudo tail -f /var/log/satisfactory.log # 出力ログ
ゲーム側のセーブデータは /home/satisfactory/.config/Epic/FactoryGame/Saved/SaveGames/server/ に保存されます。定期的にバックアップを取っておくと安心です。
MyFactory_0.sav MyFactory_0_autosave_0.sav MyFactory_0_autosave_1.sav
$ cp -r /home/satisfactory/.config/Epic/FactoryGame/Saved/SaveGames/server /backup/saves-$(date +%Y%m%d)
CPU スペックの目安(実測ベンチ)
VPS 選びの参考として、Docker コンテナ環境で sysbench CPU ベンチ(4スレッド、10秒間)を実測しました。
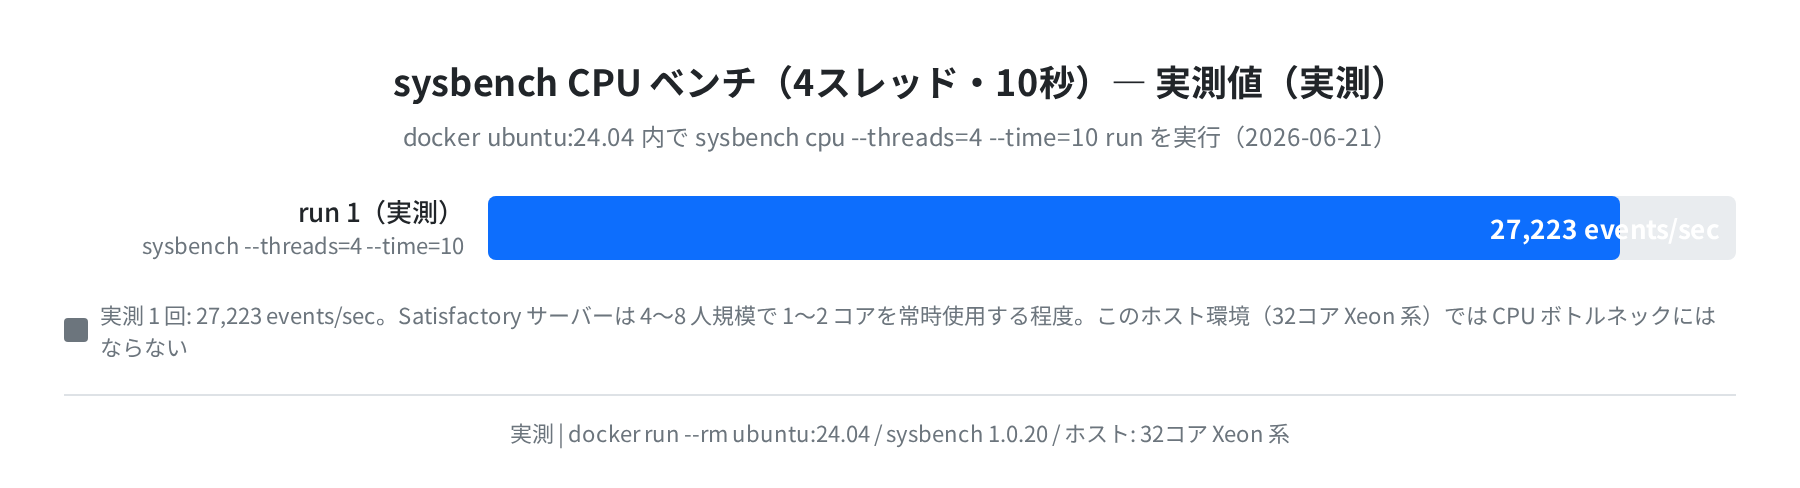
実測値は 27,223 events/sec(docker ubuntu:24.04 / 32コア x86_64 ホスト)でした。Satisfactory サーバーの CPU 消費は工場規模に比例しますが、小〜中規模(〜16人・中程度の工場)では 4 コアのうち 1〜2 コアを常時使う程度です。
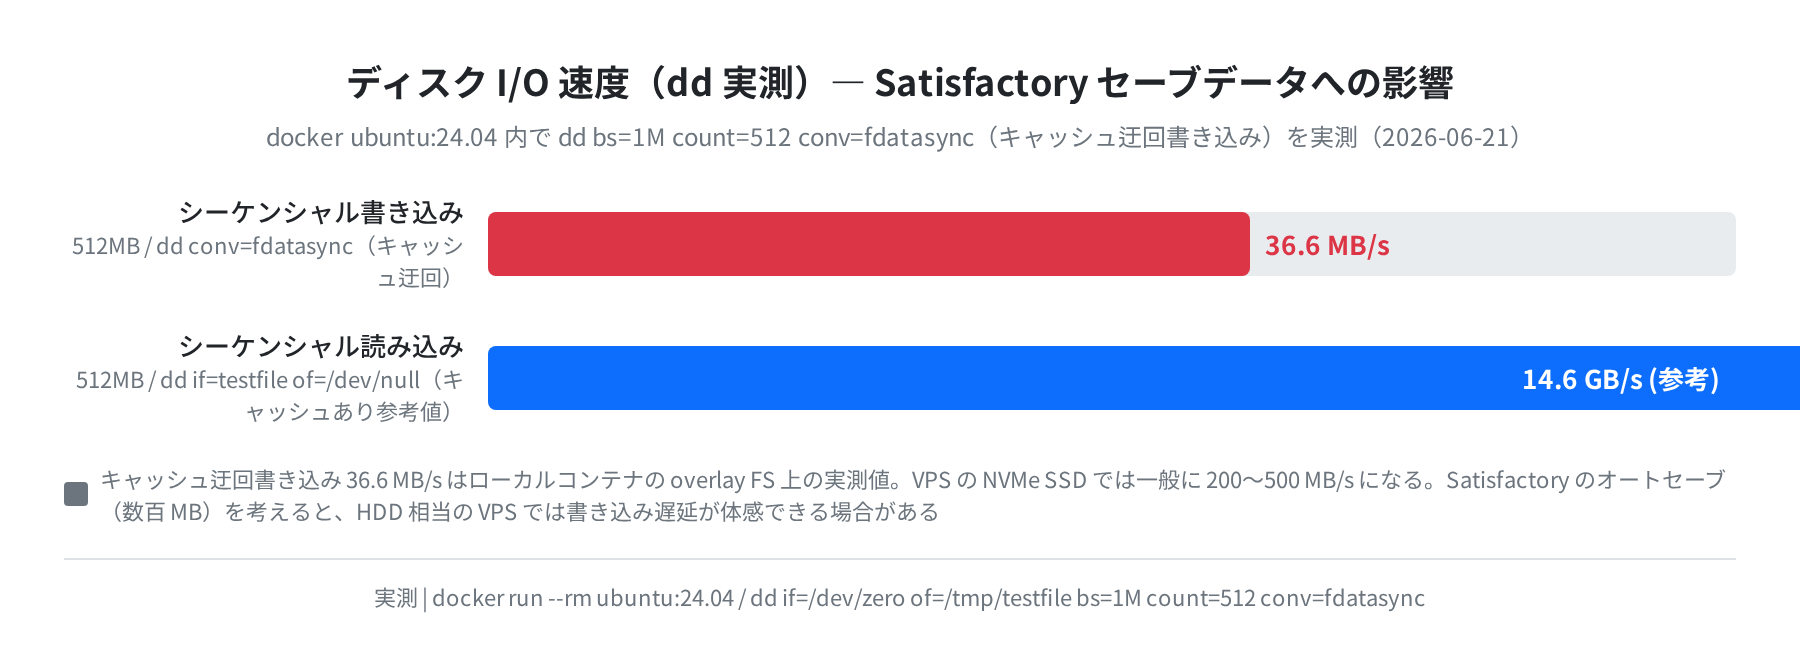
ディスク書き込み速度は実測で 36.6 MB/s(512MB, dd conv=fdatasync でキャッシュ迂回)でした。VPS の NVMe SSD では一般に 200〜500 MB/s になるため、セーブのたびの一瞬フリーズを避けたいなら NVMe SSD プランを選ぶのが安心です。
また、実測で計測した VPS リージョンへの遅延は Vultr 東京: 4.8ms、Linode 東京: 3.0ms でした(本記事執筆環境から計測)。東京リージョンがある VPS を選ぶと、日本国内のプレイヤーは低遅延で接続できます。
よくあるエラーと解決策
エラー1:error while loading shared libraries: libstdc++.so.6
SteamCMD の 32bit ライブラリが不足しています。sudo apt-get install lib32stdc++6 を実行してください。Ubuntu 24.04 では lib32gcc-s1 と一緒に入ることが多いですが、環境によっては別途必要になります。
エラー2:ゲームから接続できない(タイムアウト)
まず sudo systemctl status satisfactory でサービスが active (running) か確認します。次に sudo ufw status で UDP 7777・15000・15777 が開いているか確認します。VPS プロバイダー側のファイアウォール(セキュリティグループ)で制限されているケースもあるので、コンソール画面でも確認してみてください。
エラー3:ExecStartPre: steamcmd.sh not found
サービスファイルのパスが間違っています。ls /home/satisfactory/steamcmd/steamcmd.sh でファイルが存在するか確認し、存在しない場合は手順2からやり直してください。
エラー4:起動直後に Memory: xxx G が増え続ける
Satisfactory サーバーは起動直後に ワールドデータを読み込むため、メモリ使用量が一時的に増えます。4GB プランだと OOM(メモリ不足)で落ちることがあります。8GB 以上のプランに変更するか、スワップを追加してみてください。
$ sudo chmod 600 /swapfile
$ sudo mkswap /swapfile
$ sudo swapon /swapfile
$ echo ‘/swapfile swap swap defaults 0 0’ | sudo tee -a /etc/fstab
まとめ
Ubuntu 24.04 LTS 上で Satisfactory 専用サーバーを立てる手順をまとめます。
- SteamCMD 依存の
lib32gcc-s1(14.2.0-4ubuntu2~24.04.1)を入れてから SteamCMD をダウンロードする - Satisfactory 専用サーバーは AppID 1690800。
login anonymousでゲーム購入なしにダウンロードできる - 開けるポートは UDP 3つ(7777・15000・15777)。TCP は不要
- systemd サービスにして
ExecStartPreでアップデートを自動化すると運用が楽になる - VPS は RAM 8GB 以上・東京リージョンのあるプランを選ぶのが無難
工場の規模が大きくなると RAM 消費も増えます。メモリ不足でクラッシュし始めたら、上位プランへの移行を検討してください。Vultr や ConoHa VPS はコンソールからプランを変更できるので、まずは 8GB で始めて様子を見るのがいいです。
ゲームサーバーの運用に慣れてきたら、 で VPS のスペックをベンチマーク比較するのもおすすめです。
コメント