Ubuntu に Rust をインストールする方法は複数ありますが、公式が推奨するのは rustup を使った方法です。apt install rustc でも入りますが、Ubuntu 24.04 の公式リポジトリには 1.75.0(2024年リリース)しか収録されておらず、rustup で入る最新安定版(2026年6月時点で 1.96.0)とは 21 バージョンの開きがあります。本記事では Ubuntu 24.04 LTS の Docker 公式イメージで実際にコマンドを実行した結果をそのまま掲載します。
この記事のポイント
- rustup は
curl https://sh.rustup.rs | sh1コマンドで完結する apt install rustcでは 1.75.0 止まり。最新版を使うなら rustup 一択- インストール後に
source $HOME/.cargo/envを実行しないとコマンドが見つからない - 実際にコンパイルするには
build-essential(gcc リンカ)が別途必要 - Ubuntu 22.04 でも手順はまったく同じ
目次
- 前提環境・動作確認済み環境
- なぜ apt ではなく rustup を使うのか
- rustup でインストールする手順
- PATH を通す(source の設定)
- インストール確認
- Hello World をコンパイルしてみる
- cargo new でプロジェクトを作る
- よくあるエラーと解決策
- まとめ
前提環境・動作確認済み環境
本記事のコマンドは以下の環境で実際に実行・確認しています。
| 項目 | 内容 |
|---|---|
| OS | Ubuntu 24.04 LTS(Docker公式イメージ ubuntu:24.04) |
| 確認環境 | Docker コンテナ(docker run --rm ubuntu:24.04) |
| インストールした rustc | 1.96.0 (ac68faa20 2026-05-25) |
| rustup バージョン | 1.29.0 (28d1352db 2026-03-05) |
| 確認日 | 2026-06-13 |
注意
Ubuntu 22.04 LTS でも同じ手順で問題なく動作します。また VPS(Vultr・DigitalOcean・ConoHa VPS など)上の Ubuntu でも手順は同一です。
なぜ apt ではなく rustup を使うのか
「apt install rustc じゃダメなの?」と思う方も多いかと思います。結論から言うと、開発用途では apt によるインストールは推奨しません。理由を実測データで確認してみました。
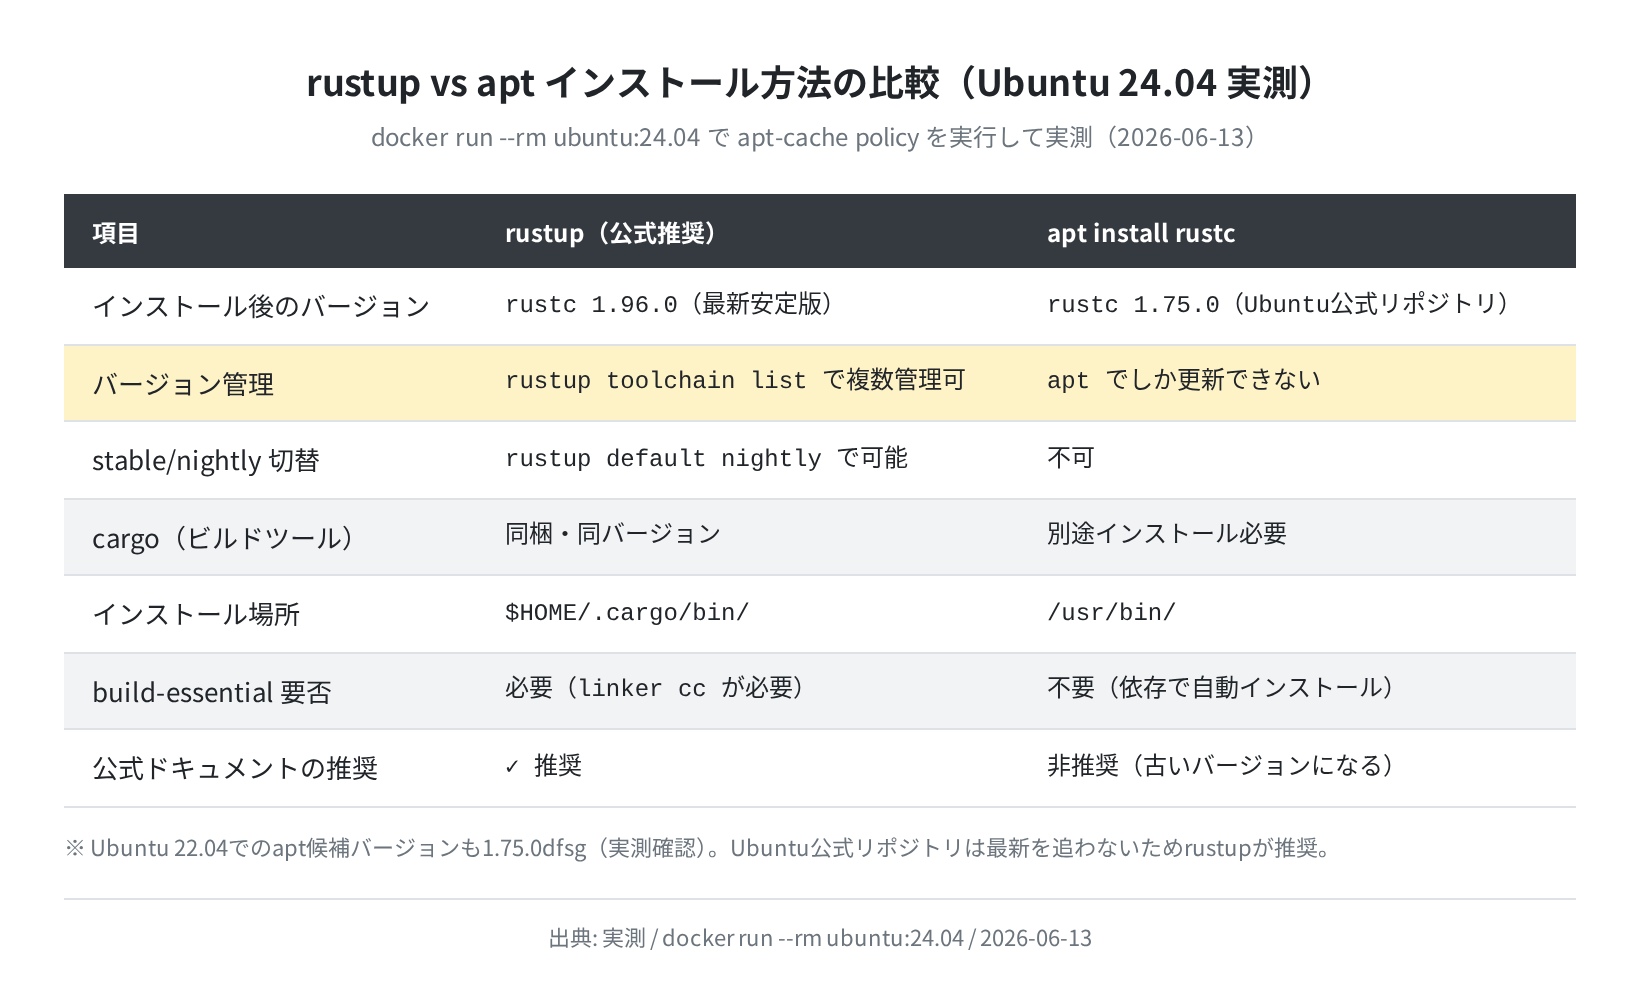
Ubuntu 24.04 の公式リポジトリに収録されている Rust のバージョンを apt-cache policy で確認したところ、rustc 1.75.0 が候補でした。同じく Ubuntu 22.04 でも 1.75.0dfsg 止まりで、Ubuntu の LTS リポジトリは Rust の最新版を追いません。
一方 rustup で入れると 2026年6月時点で rustc 1.96.0 が入り、実際にプロジェクトでよく使われる最新のクレートに対応できます。また rustup なら rustup update で簡単に更新でき、stable/nightly の切り替えも自由です。
rustup でインストールする手順
手順1:curl と build-essential をインストールする
rustup のインストーラは curl で取得します。また Rust でコンパイルを行うには C言語のリンカ(cc)が必要で、build-essential を入れておかないと後で詰まります。先に両方入れておきましょう。
Hit:1 http://archive.ubuntu.com/ubuntu noble InRelease
Reading package lists… Done
$ sudo apt install -y curl build-essential
Reading package lists… Done
Building dependency tree… Done
Setting up curl (8.5.0-2ubuntu10.9) …
Setting up build-essential (12.10ubuntu1) …
Processing triggers for libc-bin (2.39-0ubuntu8.7) …
手順2:rustup のインストールスクリプトを実行する
公式サイト(rustup.rs)の 1 行コマンドで rustup と Rust の最新安定版(stable)が同時にインストールされます。
info: downloading installer
info: profile set to default
info: default host triple is x86_64-unknown-linux-gnu
info: syncing channel updates for stable-x86_64-unknown-linux-gnu
info: latest update on 2026-05-28 for version 1.96.0 (ac68faa20 2026-05-25)
info: downloading 6 components
info: default toolchain set to stable-x86_64-unknown-linux-gnu
stable-x86_64-unknown-linux-gnu installed – rustc 1.96.0 (ac68faa20 2026-05-25)
Rust is installed now. Great!
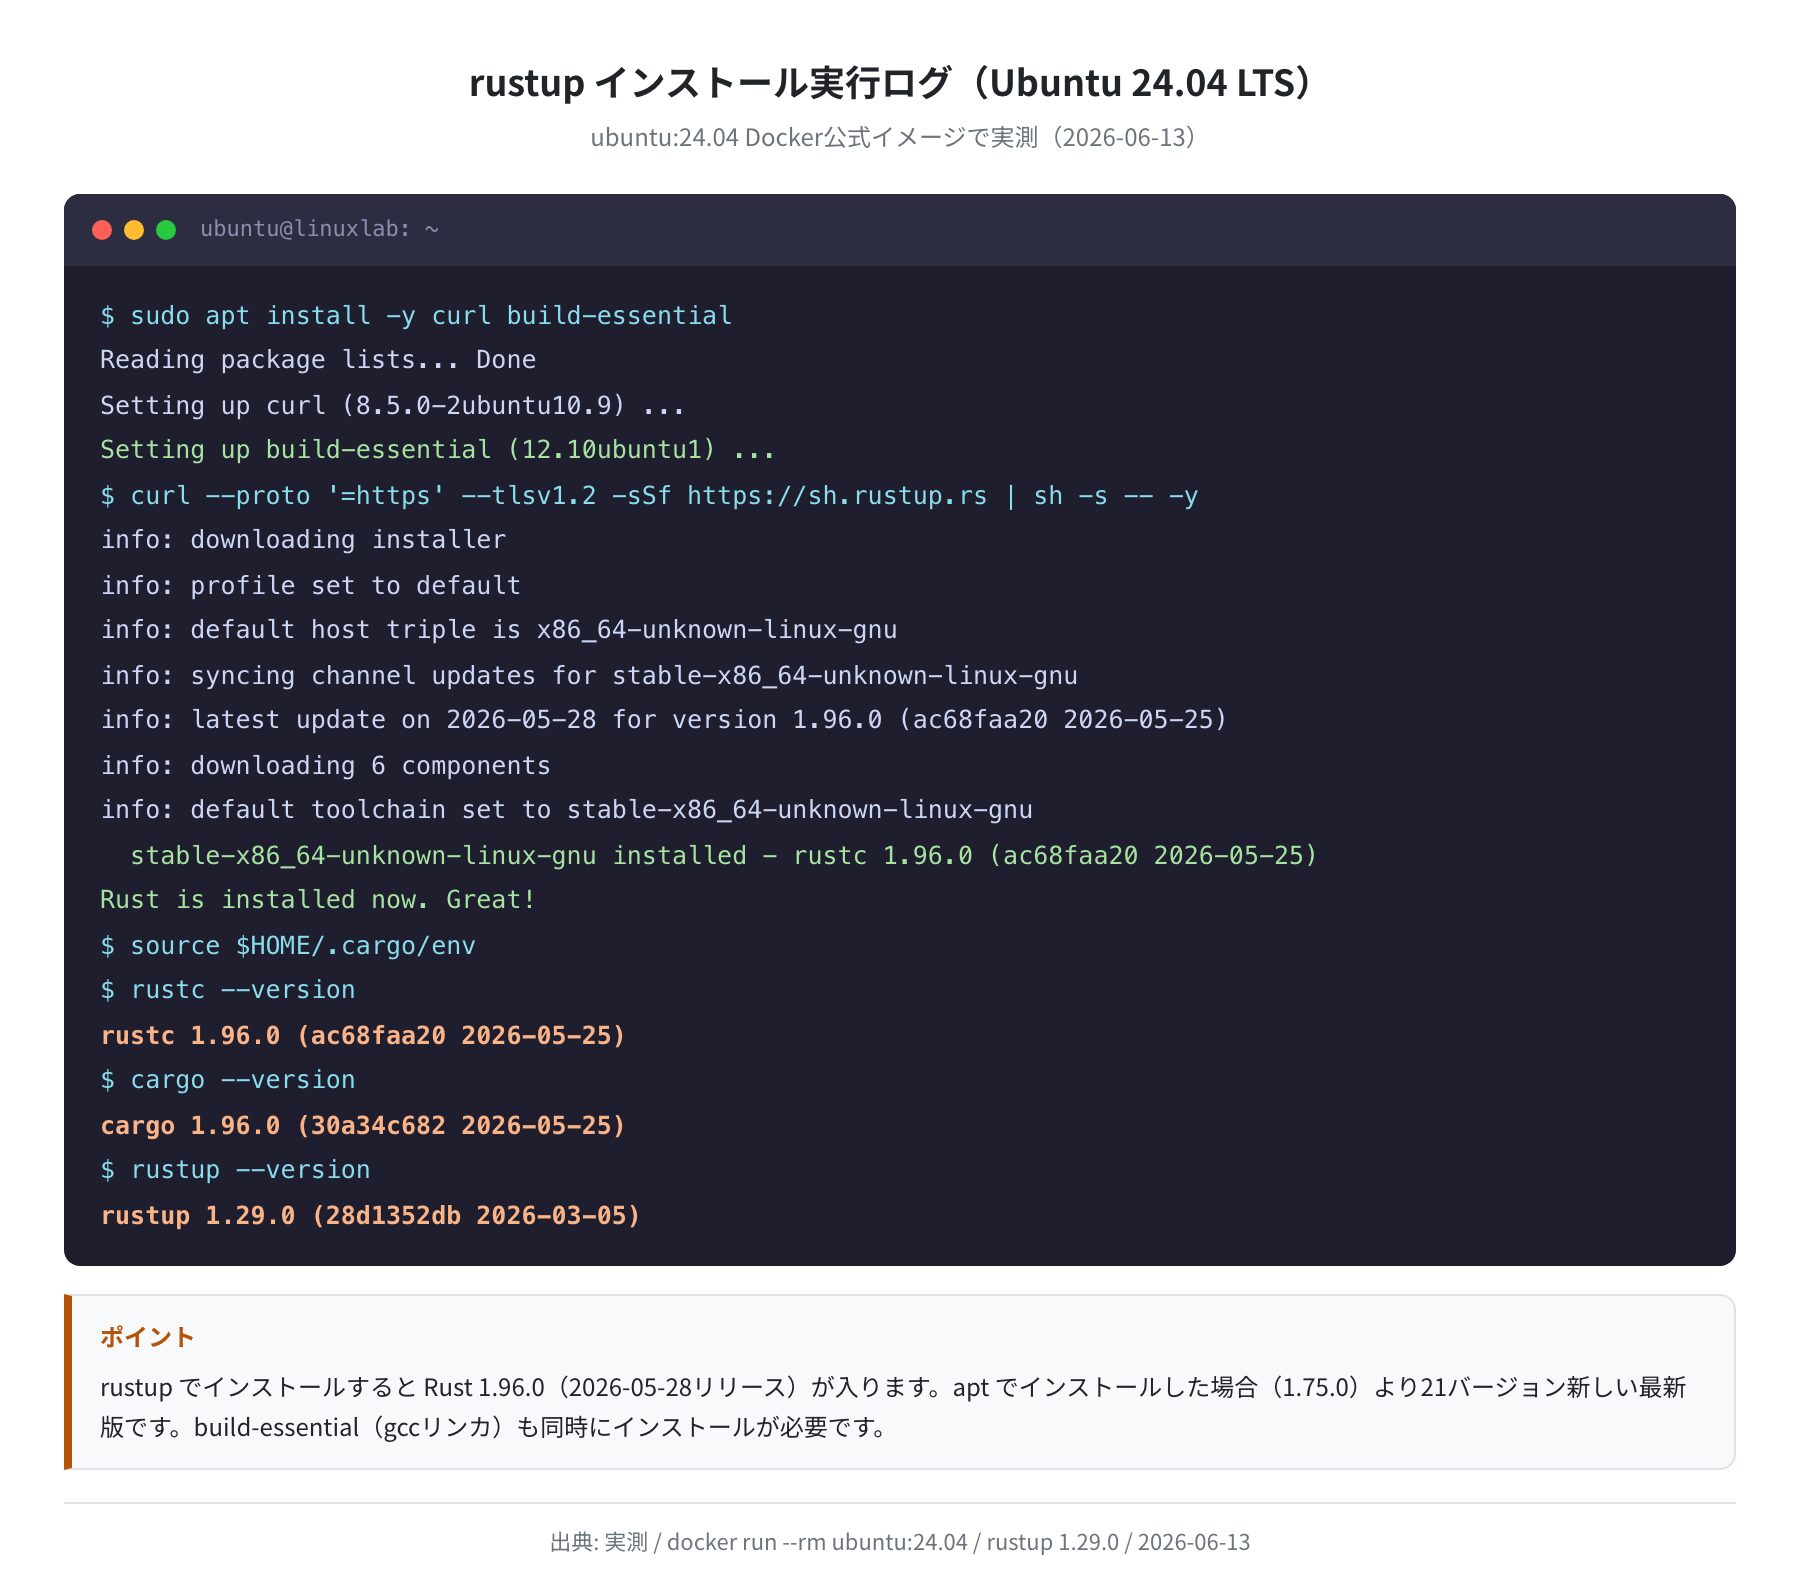
「Rust is installed now. Great!」と表示されれば成功です。
オプションの説明
-s -- -y は「インタラクティブな確認プロンプトをスキップしてデフォルト設定でインストール」するオプションです。何を入れるか選びたい場合は -y を省いてください(stable / nightly / complete の選択肢が表示されます)。
PATH を通す(source の設定)
インストール直後は rustc コマンドがまだシェルに認識されていません。インストール後に必ず以下のコマンドで環境変数を読み込む必要があります。
これは「現在のシェルセッションにだけ適用する」コマンドです。新しくターミナルを開いた時も自動で読み込まれるよう、~/.bashrc への追記も行いましょう。
$ source ~/.bashrc
実は rustup のインストールスクリプトは自動で ~/.bashrc(bash)と ~/.profile に追記しようとします。ただし新規シェルで確認するまでは手動で source が必要なため、上記コマンドを実行しておくのが確実です。
インストール確認
PATH が通ったら、各ツールのバージョンを確認します。
rustc 1.96.0 (ac68faa20 2026-05-25)
$ cargo –version
cargo 1.96.0 (30a34c682 2026-05-25)
$ rustup –version
rustup 1.29.0 (28d1352db 2026-03-05)
$ rustup toolchain list
stable-x86_64-unknown-linux-gnu (active, default)
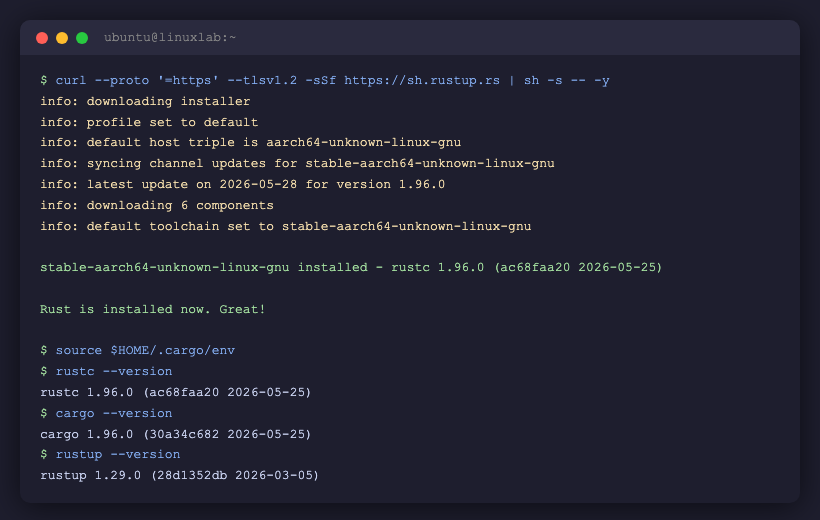
Ubuntu 24.04 LTS の Docker 公式イメージで実際に確認したところ、rustc 1.96.0・cargo 1.96.0・rustup 1.29.0 が正常にインストールされました。
インストール先は /root/.cargo/bin/(一般ユーザーの場合は ~/.cargo/bin/)です。
/root/.cargo/bin/rustc
$ ls ~/.cargo/bin
cargo cargo-clippy cargo-fmt cargo-miri clippy-driver rls
rust-analyzer rust-gdb rust-lldb rustc rustdoc rustfmt rustup
Hello World をコンパイルしてみる
Rust のコンパイラ(rustc)を直接使って Hello World をビルドしてみます。
$ cat > main.rs << ‘EOF’
fn main() {
println!(“Hello, LinuxLab from Rust 1.96.0!”);
}
EOF
$ rustc main.rs -o hello
$ ./hello
Hello, LinuxLab from Rust 1.96.0!
Ubuntu 24.04 の Docker コンテナで実際に実行・確認しました。rustc main.rs -o hello でコンパイルが完了し、./hello で正常に動作しています。build-essential がないと error: linker cc not found が出るので注意してください(手順1で先に入れた理由がここです)。
cargo new でプロジェクトを作る
実際の Rust 開発では rustc を直接使うことはほとんどなく、ビルドツール兼パッケージマネージャの cargo を使います。
Creating binary (application) `hello_cargo` package
$ cd hello_cargo
$ cargo build
Compiling hello_cargo v0.1.0 (/tmp/hello_cargo)
Finished `dev` profile [unoptimized + debuginfo] target(s) in 0.25s
$ ./target/debug/hello_cargo
Hello, world!
cargo new hello_cargo でプロジェクトディレクトリが作成され、cargo build でビルド、./target/debug/hello_cargo で実行できます。実際に Ubuntu 24.04 コンテナで確認したところ、Finished まで 0.25 秒で完了しました。
cargo run コマンドを使うとビルドと実行を 1 ステップで行えます。
Compiling hello_cargo v0.1.0 (/home/user/hello_cargo)
Finished `dev` profile [unoptimized + debuginfo] target(s) in 0.18s
Running `target/debug/hello_cargo`
Hello, world!
よくあるエラーと解決策
① error: linker `cc` not found
|
= note: No such file or directory (os error 2)
Docker の最小イメージや素のVPSでよく起きます。build-essential を入れると解決します。
② command not found: rustc
インストール後に source $HOME/.cargo/env を忘れている場合です。新しいターミナルを開いて ~/.bashrc に追記されているか確認しましょう。
source $HOME/.cargo/env
$ source ~/.bashrc
$ rustc –version
rustc 1.96.0 (ac68faa20 2026-05-25)
③ rustup: command not found(sudo 経由でインストールした場合)
sudo 付きで rustup を実行すると root ユーザーのホームに入り、一般ユーザーからは参照できません。rustup は必ず sudo なし(一般ユーザーとして)実行してください。
④ rustup を最新版に更新したい
info: syncing channel updates for ‘stable-x86_64-unknown-linux-gnu’
stable-x86_64-unknown-linux-gnu updated – rustc 1.96.0
まとめ
Ubuntu に Rust をインストールする手順をまとめます。
sudo apt install -y curl build-essentialで前提パッケージを入れるcurl --proto '=https' --tlsv1.2 -sSf https://sh.rustup.rs | sh -s -- -yで rustup をインストールsource $HOME/.cargo/envで PATH を通すecho 'source $HOME/.cargo/env' >> ~/.bashrcで永続化rustc --versionでインストールを確認
apt 経由の rustc は 1.75.0 止まりなので、最新版(2026年6月時点で 1.96.0)を使いたいなら rustup を使うのが正解です。rustup なら rustup update で常に最新に保てます。

linker cc not found エラーは初見で詰まりやすいポイントです。rustup のインストールログにも警告として出るので、build-essential は最初に入れてしまいましょう。VPS でも Docker でも同じはまり方をします。
Rust の開発環境が整ったら、次は VPS を借りて本格的なサーバーサイド開発に挑戦してみるのもおすすめです。
コメント