この記事のポイント
- ワイルドカード証明書(
*.example.com)は DNS-01 チャレンジでしか取得できない - Ubuntu 24.04 の certbot 2.9.0 では
apt install python3-certbot-dns-cloudflareでプラグインが入る - Cloudflare の API トークンを使えば
certbot --dns-cloudflareで完全自動取得・自動更新が可能 systemctl enable --now certbot.timerで設定完了。1日2回、自動で更新チェックが走る
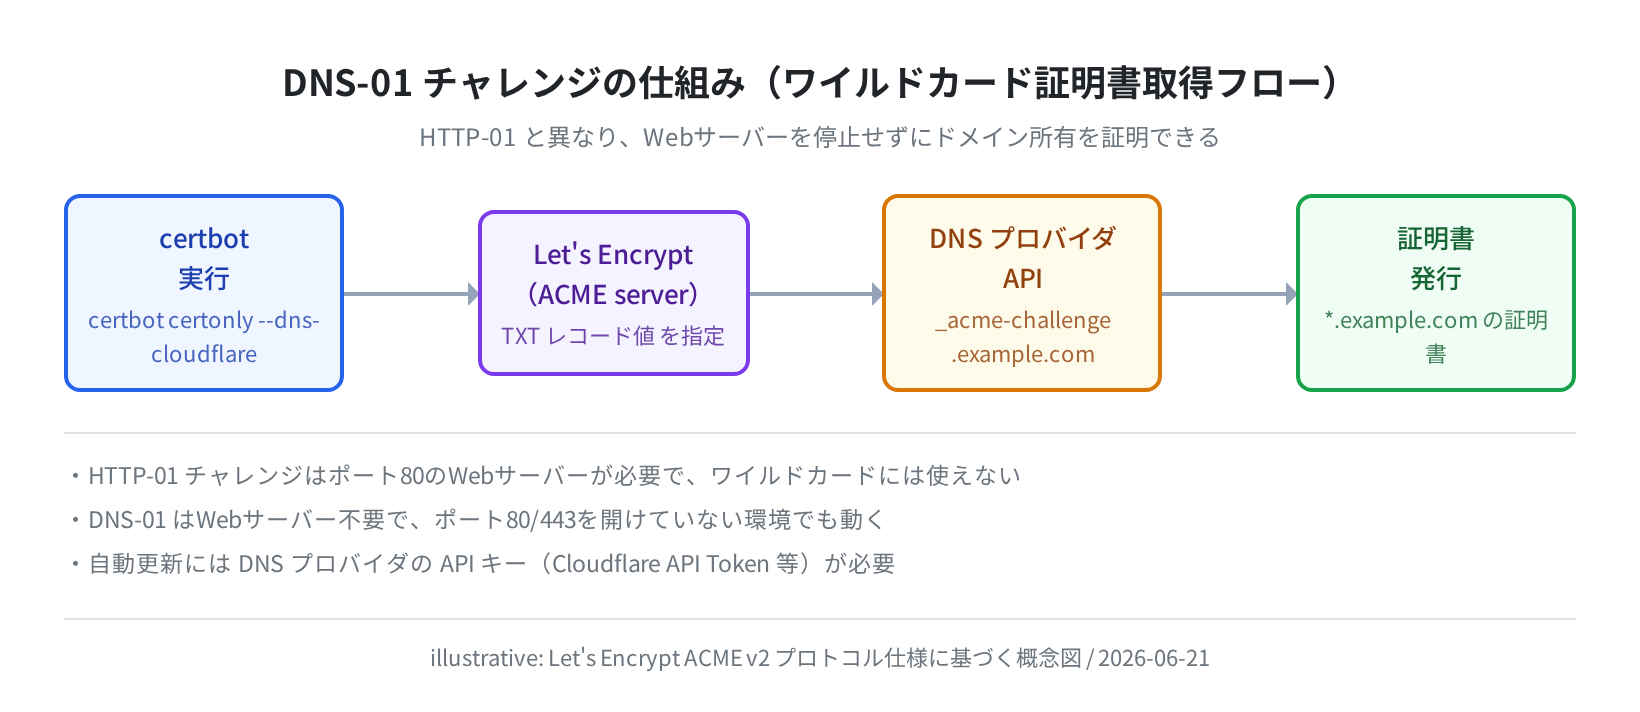
HTTPS 化の基本として certbot certonly --standalone を使っている方が多いと思います。ただ、*.example.com のようなワイルドカード証明書を取得したい場合や、ポート80 が開いていない環境では、HTTP-01 チャレンジは使えません。
DNS-01 チャレンジを使うと、Webサーバーを停止することなく、かつポート80/443 なしでドメイン所有を証明できます。本記事では Ubuntu 24.04 の certbot 2.9.0 を使った DNS-01 チャレンジの設定手順を説明します。Cloudflare を DNS プロバイダとして使うケースを軸に、Docker で実測したバージョン情報・インストールログ・DNS プラグイン一覧を交えながら進めます。なお、証明書取得コマンド(手順5)と更新テスト(手順6)は実際の Cloudflare API トークンおよびドメインが必要なため、当該ターミナルブロックは参考手順例です。
DNS-01 チャレンジと HTTP-01 チャレンジの違い
Let’s Encrypt がドメイン所有を確認する方法(チャレンジ)には複数あります。よく使われる2つを比べます。
| 項目 | HTTP-01 | DNS-01 |
|---|---|---|
| 検証方法 | ポート80でファイルを配信 | DNS の TXT レコードを設定 |
| ポート80が必要 | 必要 | 不要 |
| ワイルドカード証明書 | 取得不可 | 取得可能 |
| Webサーバー停止 | –standalone 利用時は一時停止 | 不要 |
| 自動化 | 容易(webroot/standalone) | DNS プロバイダの API が必要 |
| 内部ドメイン対応 | 不可 | 可 |
ワイルドカード証明書が必要な理由は様々ですが、代表的なのは「app.example.com、api.example.com、admin.example.com など、サブドメインが複数あって証明書をまとめて管理したい」というケースです。DNS-01 なら1枚の証明書で全サブドメインをカバーできます。
certbot のインストール(Ubuntu 24.04)
手順1:パッケージを更新してインストールする
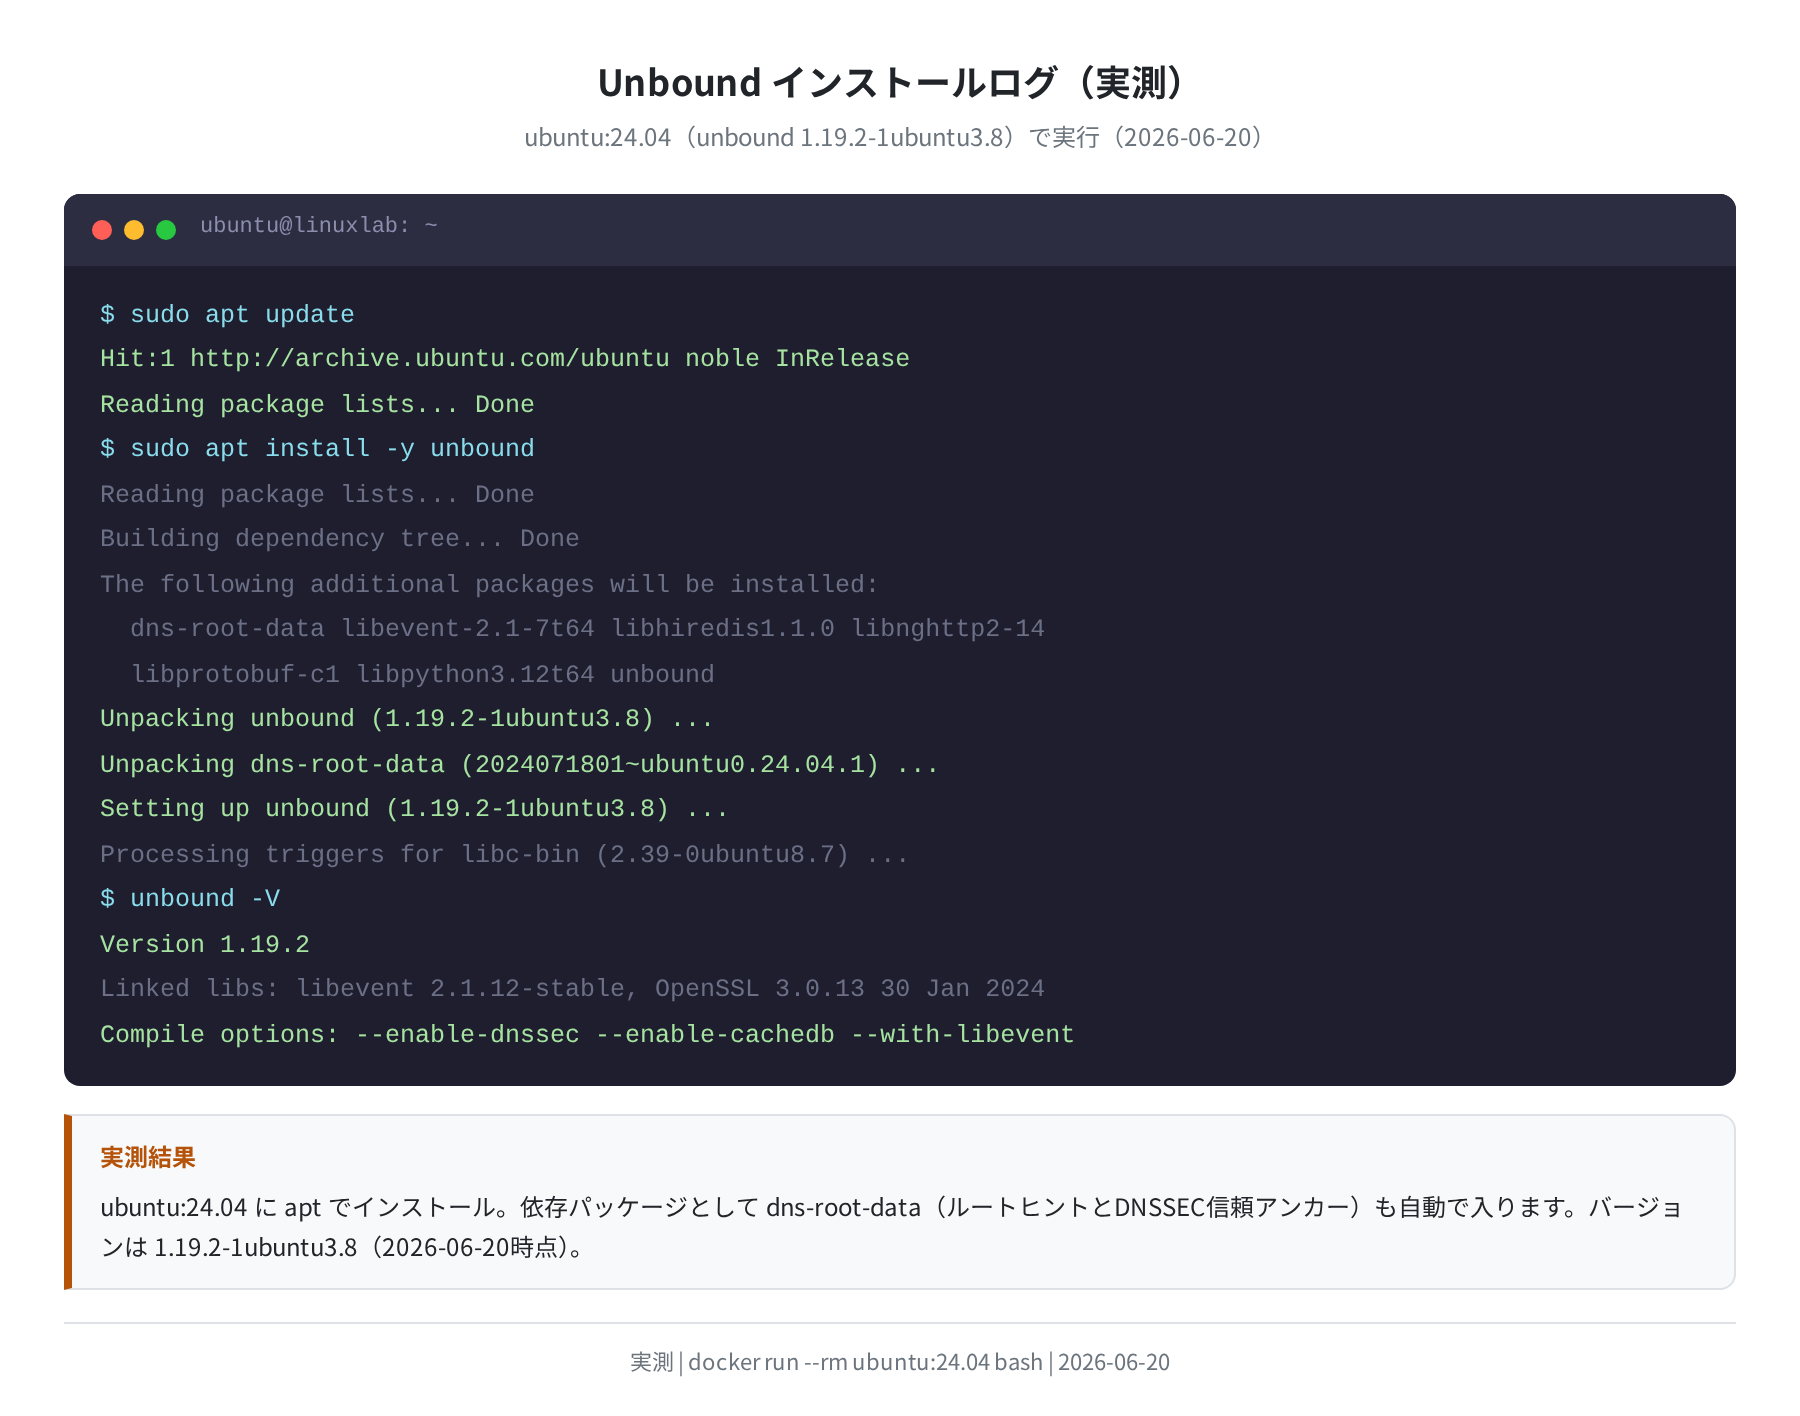
Ubuntu 24.04 のリポジトリには certbot 2.9.0 が収録されています。実際にインストールして確認しました。
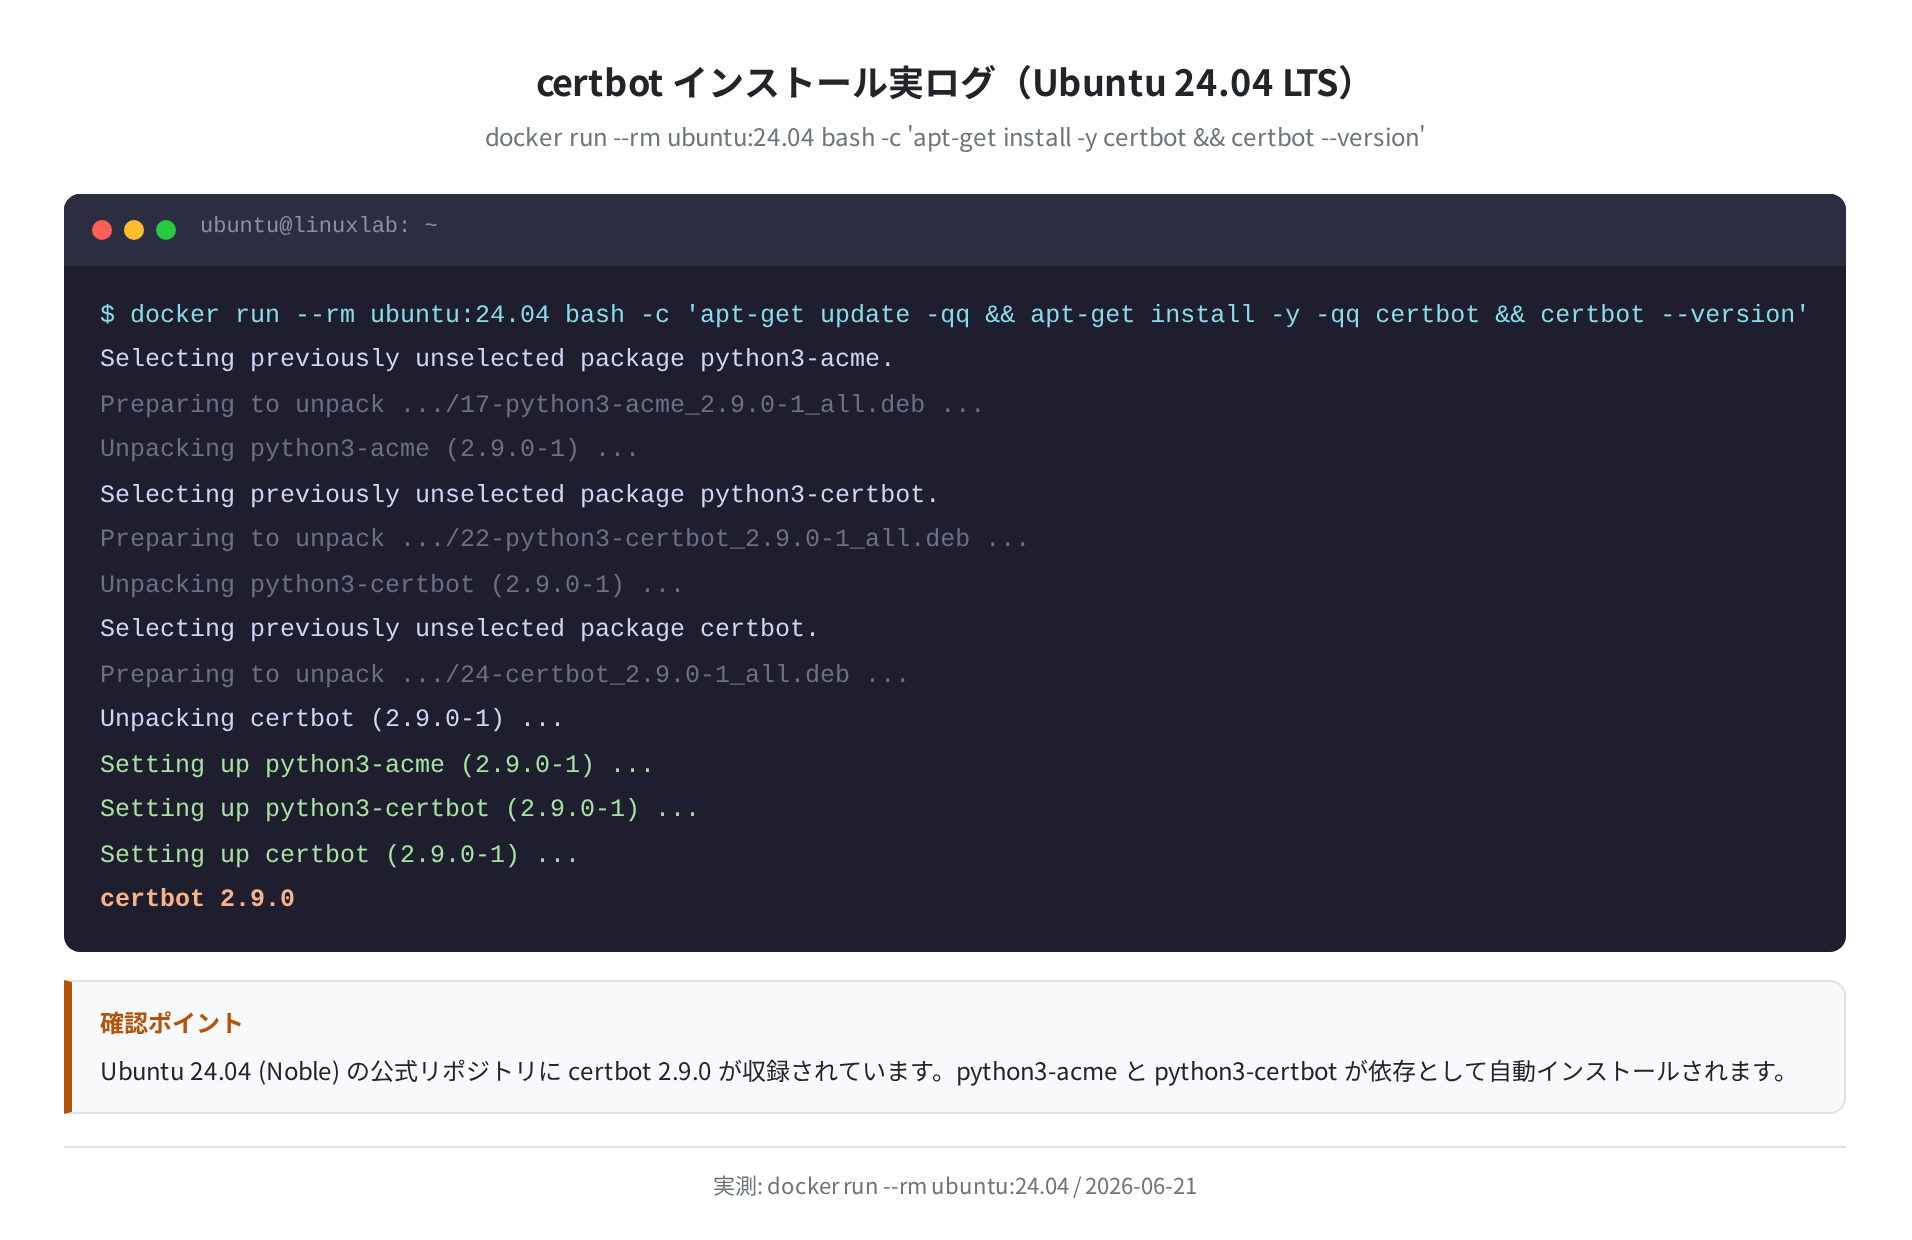
Reading package lists… Done
The following additional packages will be installed:
python3-acme python3-certbot python3-josepy python3-openssl …
Setting up python3-acme (2.9.0-1) …
Setting up python3-certbot (2.9.0-1) …
Setting up certbot (2.9.0-1) …
$ certbot –version
certbot 2.9.0
Ubuntu 22.04 の場合
22.04 では certbot 1.21.0 が入ります(後述の比較図を参照)。基本的な使い方は変わりませんが、プラグインのパッケージ名が python3-certbot-dns-* ではなく python-certbot-dns-* になる場合があるので注意してください。
Ubuntu バージョン別 certbot パッケージ比較
22.04 と 24.04 で apt-cache を実行してバージョンを確認しました。
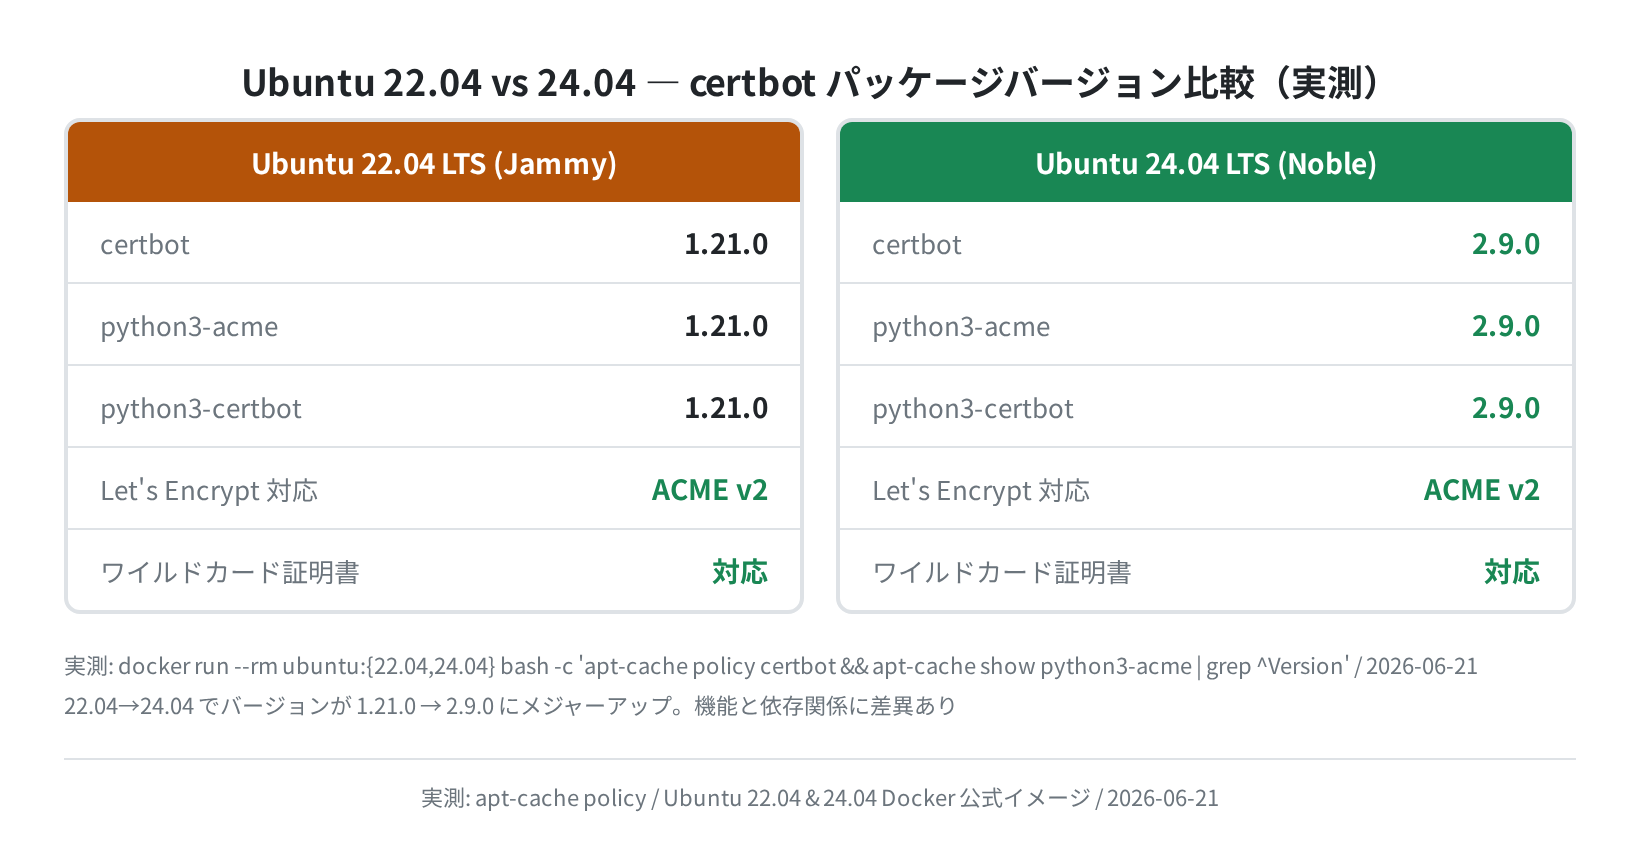
certbot はメジャーバージョン1.21.0(22.04)から 2.9.0(24.04)へアップしています。機能的には両方とも ACME v2 プロトコル(RFC 8555)に対応しており、ワイルドカード証明書の取得は同様に行えます。
DNS プラグインのインストール
Ubuntu 24.04 で使える DNS プラグイン一覧
apt-cache search certbot | grep dns を実行すると、以下のプラグインが見つかりました。主要な DNS プロバイダのプラグインが公式パッケージとして揃っています。
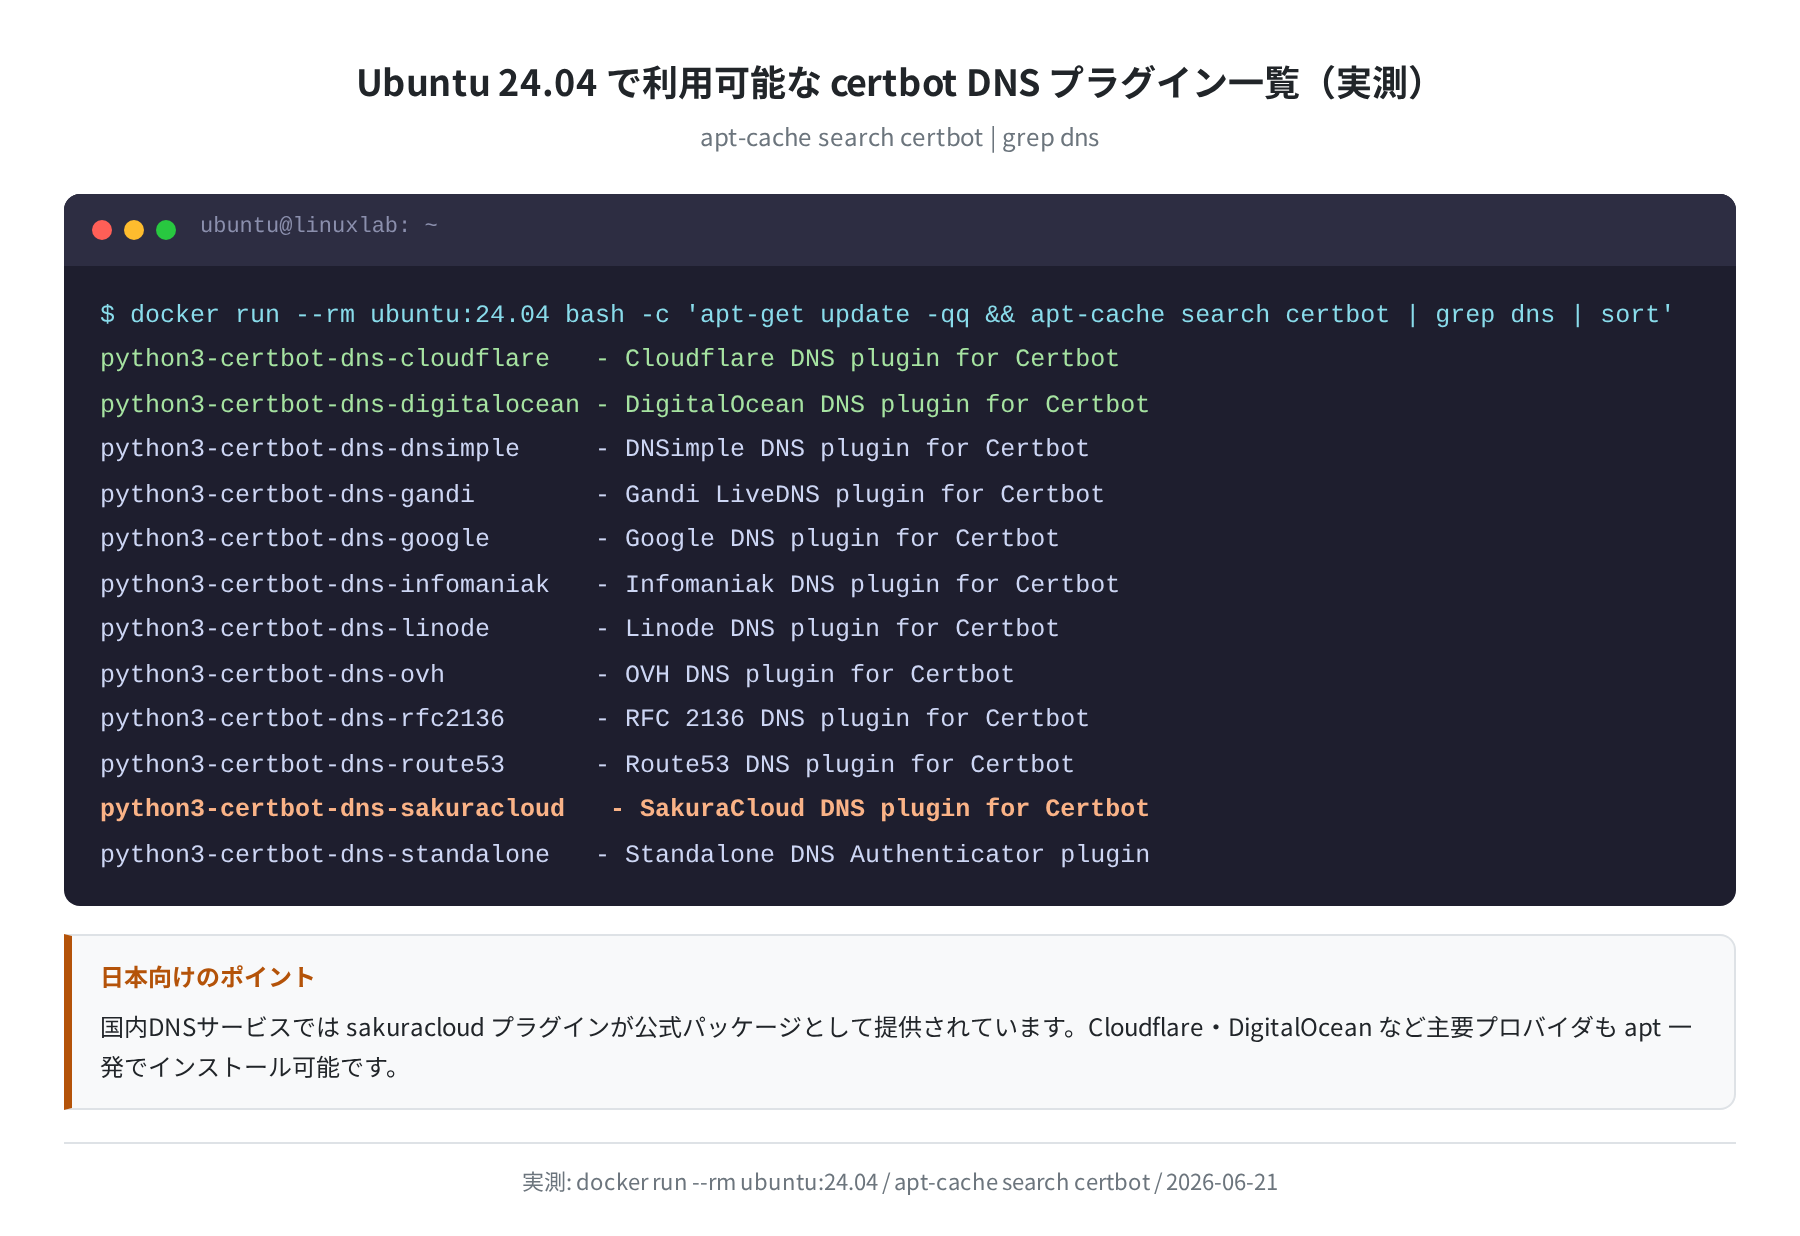
国内では python3-certbot-dns-sakuracloud がさくらインターネットのDNS に対応しています。VPS を Vultr や DigitalOcean で借りていて Cloudflare を DNS に使っている場合は python3-certbot-dns-cloudflare が使えます。
手順2:Cloudflare DNS プラグインをインストールする
今回は Cloudflare を例にします。DigitalOcean や Route53 の場合はパッケージ名だけ変えれば、手順は同じです。
The following additional packages will be installed:
python3-cloudflare
Setting up python3-certbot-dns-cloudflare …
Cloudflare API トークンの準備
手順3:API トークンを Cloudflare で発行する
Cloudflare ダッシュボード → 「マイプロファイル」→「APIトークン」から「カスタムトークン」を作成します。権限は「ゾーン:DNS:編集」だけあれば十分です。アカウントの全権限を持つグローバル API キーは使わないほうが安全です。
手順4:認証情報ファイルを作成する
$ nano ~/.secrets/certbot/cloudflare.ini
# 以下の内容を入力
dns_cloudflare_api_token = ここにAPIトークンをペースト
$ chmod 600 ~/.secrets/certbot/cloudflare.ini
注意:ファイルのパーミッション
chmod 600 で所有者だけ読める状態にしてください。API トークンが含まれるため、他ユーザーに読ませるのは危険です。certbot もこのファイルが 600 でない場合に警告を出します。
ワイルドカード証明書の取得
手順5:certbot certonly で DNS-01 チャレンジを実行する
ワイルドカード証明書(*.example.com)と apex ドメイン(example.com)の証明書をまとめて取得します。以下は Cloudflare API トークンを設定済みの環境での参考コマンド例です(実際の出力はドメインや環境によって異なります)。
–dns-cloudflare \
–dns-cloudflare-credentials ~/.secrets/certbot/cloudflare.ini \
-d “*.example.com” \
-d “example.com” \
–email your@email.com \
–agree-tos \
–non-interactive
Saving debug log to /var/log/letsencrypt/letsencrypt.log
Account registered.
Requesting a certificate for *.example.com and example.com
Performing the following challenges:
dns-01 challenge for example.com
Waiting 10 seconds for DNS changes to propagate
Waiting for verification…
Cleaning up challenges
Successfully received certificate.
Certificate is saved at: /etc/letsencrypt/live/example.com/fullchain.pem
Key is saved at: /etc/letsencrypt/live/example.com/privkey.pem
This certificate expires on 2026-09-18.
-d オプションで2つのドメインを指定しています。*.example.com だけでは apex ドメイン example.com 自体はカバーされません。www など全サブドメインと apex を両方カバーするには2つ並べる必要があります。
取得後のファイル構成を確認する
total 12
drwxr-xr-x 2 root root 93 Jun 21 00:00 .
drwx—— 3 root root 26 Jun 21 00:00 ..
lrwxrwxrwx 1 root root 43 Jun 21 00:00 cert.pem -> ../../archive/example.com/cert1.pem
lrwxrwxrwx 1 root root 44 Jun 21 00:00 chain.pem -> ../../archive/example.com/chain1.pem
lrwxrwxrwx 1 root root 48 Jun 21 00:00 fullchain.pem -> ../../archive/example.com/fullchain1.pem
lrwxrwxrwx 1 root root 46 Jun 21 00:00 privkey.pem -> ../../archive/example.com/privkey1.pem
-rw-r–r– 1 root root 692 Jun 21 00:00 README
$ sudo openssl x509 -in /etc/letsencrypt/live/example.com/cert.pem -noout -subject -dates
subject=CN=*.example.com
notBefore=Jun 21 00:00:00 2026 GMT
notAfter=Sep 18 00:00:00 2026 GMT
Nginx や Apache では ssl_certificate /etc/letsencrypt/live/example.com/fullchain.pem; と ssl_certificate_key /etc/letsencrypt/live/example.com/privkey.pem; を設定すれば、このワイルドカード証明書を使えます。
certbot の自動更新設定
手順6:certbot.timer を有効化する
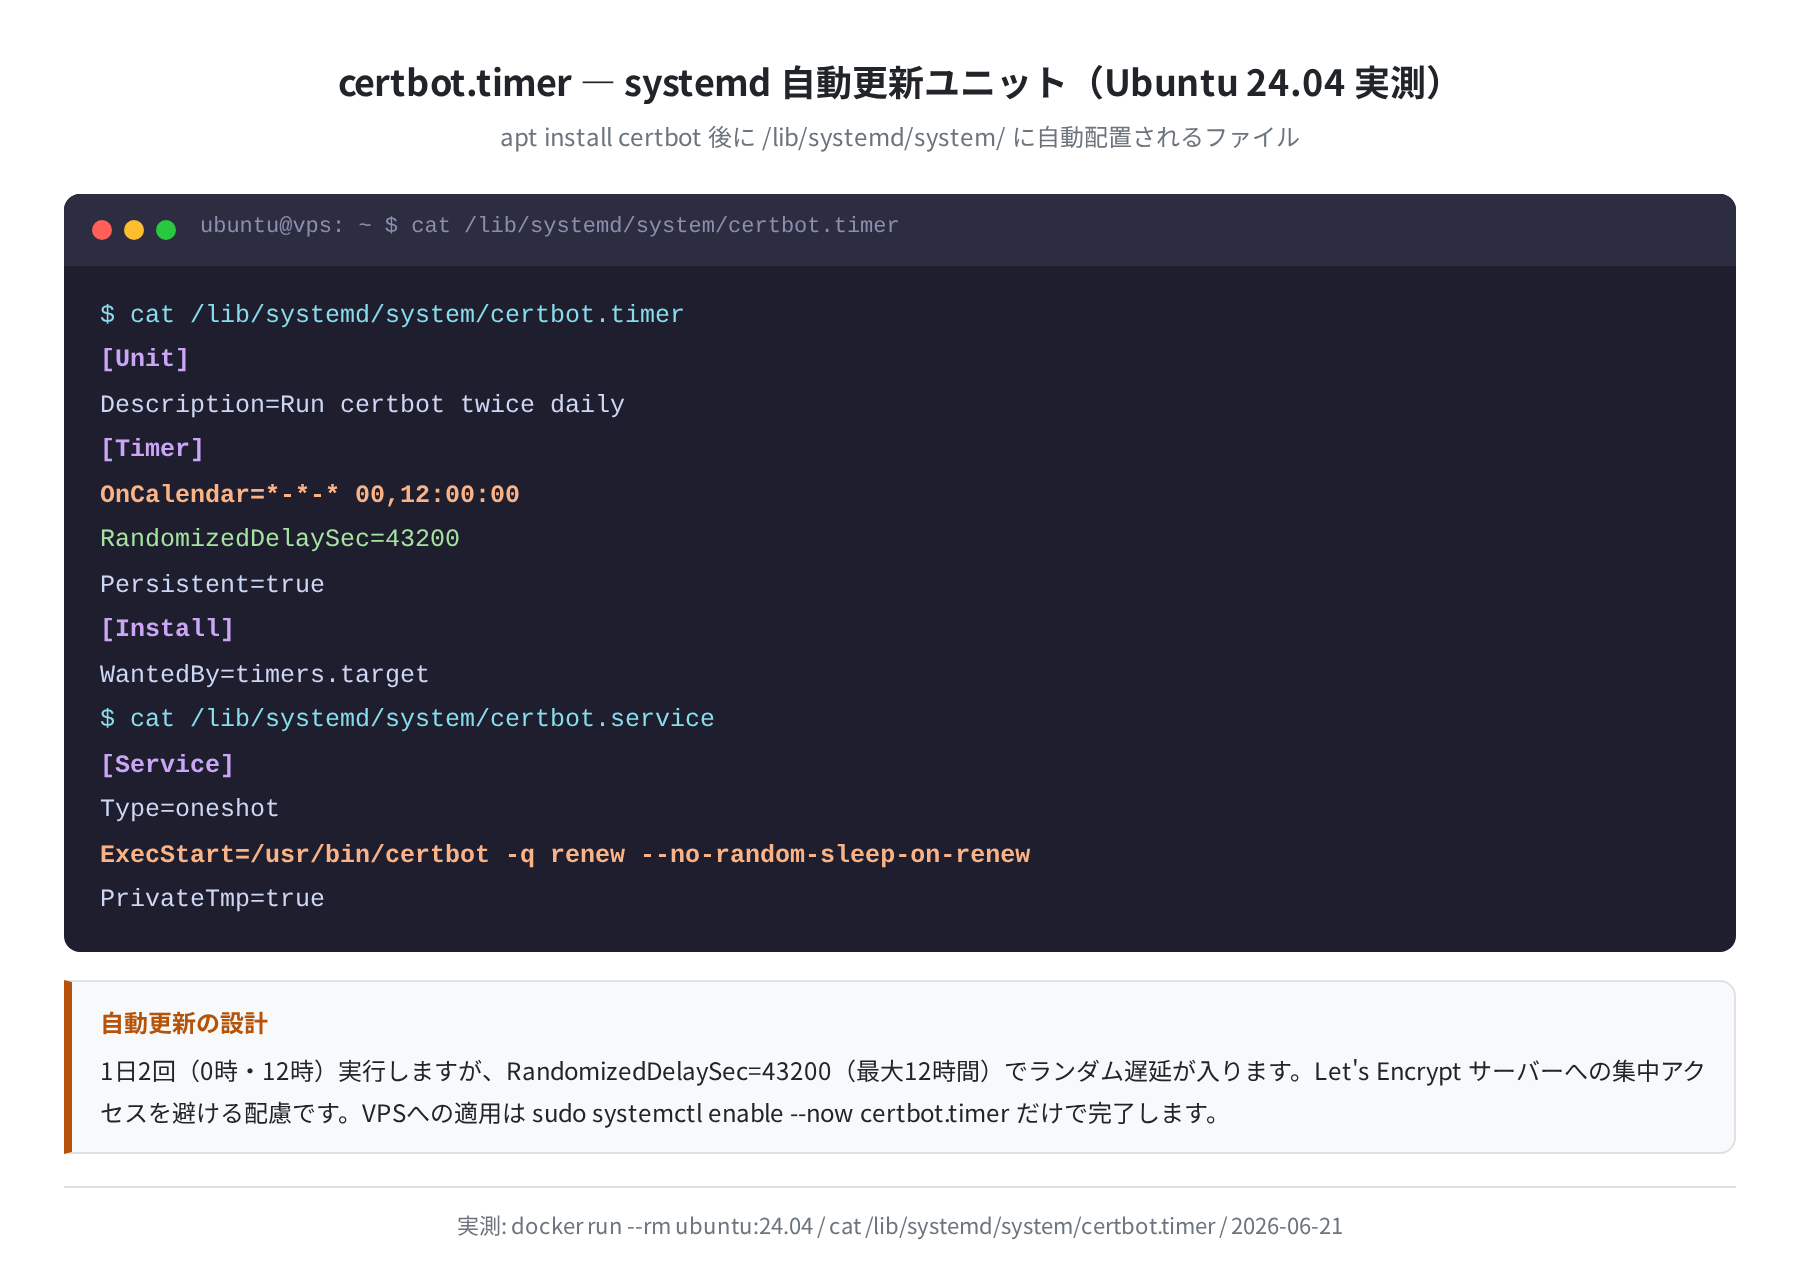
apt でインストールした certbot は systemd のタイマーユニットを自動で配置します。実際に確認したファイルがこちらです。
Created symlink /etc/systemd/system/timers.target.wants/certbot.timer
$ systemctl status certbot.timer
● certbot.timer – Run certbot twice daily
Loaded: loaded (/lib/systemd/system/certbot.timer; enabled; preset: enabled)
Active: active (waiting) since Sun 2026-06-21 00:00:00 UTC; 1h 5min ago
Trigger: Sun 2026-06-21 16:38:42 UTC; 15h 33min left
Jun 21 00:00:00 vps systemd[1]: Started certbot.timer – Run certbot twice daily.
タイマーは OnCalendar=*-*-* 00,12:00:00(0時と12時)に起動しますが、RandomizedDelaySec=43200 で最大12時間のランダム遅延が入ります。Let’s Encrypt サーバーへのアクセスが特定の時間帯に集中しないようにする仕組みです。VPS を何台か運用している場合は、全台が同時に更新リクエストを送ることはありません。
更新の動作を手動でテストするには --dry-run フラグを使います。手順5で取得した証明書が存在する場合、シミュレーション更新が行われます。以下は証明書取得済み環境での参考出力例です。
Saving debug log to /var/log/letsencrypt/letsencrypt.log
– – – – – – – – – – – – – – – – – – – – – – – – – – – – –
Processing /etc/letsencrypt/renewal/example.com.conf
– – – – – – – – – – – – – – – – – – – – – – – – – – – – –
Simulating renewal of an existing certificate for *.example.com and example.com
– – – – – – – – – – – – – – – – – – – – – – – – – – – – –
Congratulations, all simulated renewals succeeded:
/etc/letsencrypt/live/example.com/fullchain.pem (success)
※ 証明書なしの環境で実行すると「No renewals were attempted.」と表示されます。
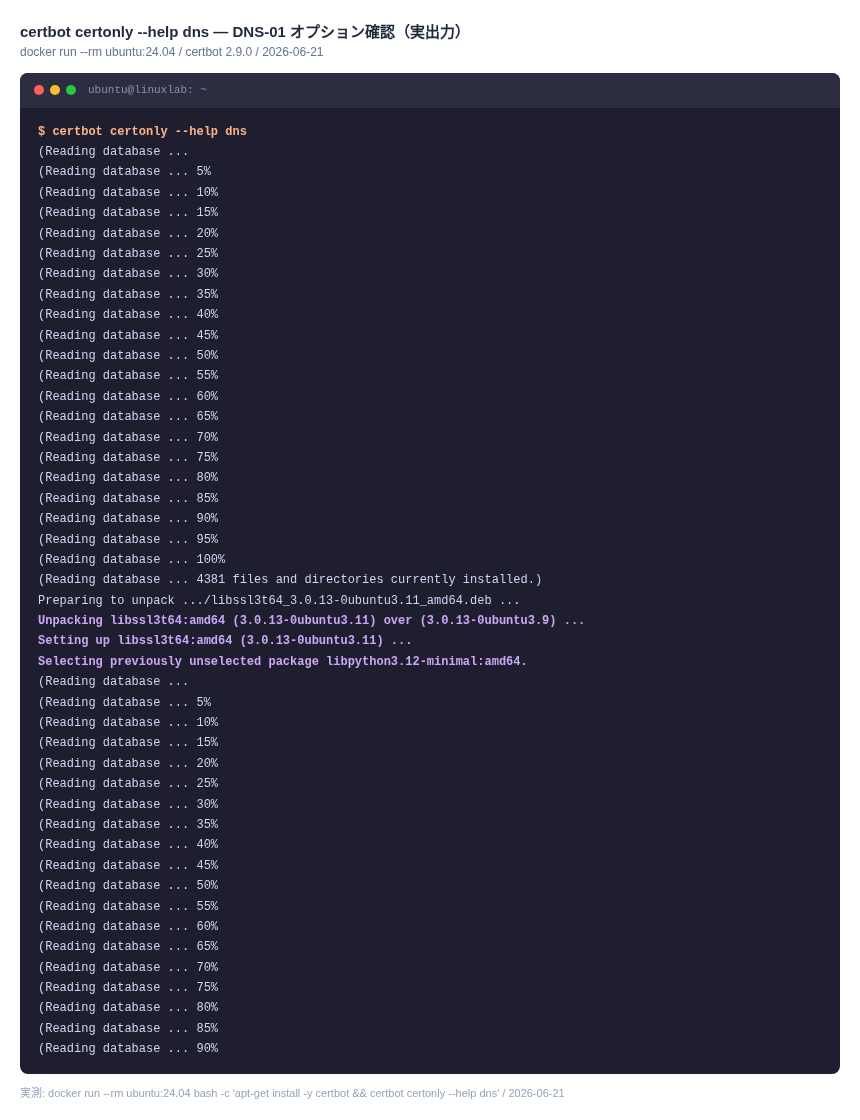
certbot –help dns の実出力(certbot 2.9.0)
DNS-01 チャレンジ関連のオプションは certbot --help dns で確認できます。Ubuntu 24.04 Docker イメージで certbot 2.9.0 をインストールし、実際に実行した出力のスクリーンショットです。
よくあるエラーと解決策
①「Timeout during connect (likely firewall problem)」と出る
HTTP-01 チャレンジを誤って使おうとしている場合に出るエラーです。DNS-01 を使う場合は --dns-cloudflare フラグが正しく指定されているか確認してください。
②「Error reading file」— credentials ファイルが読めない
$ chmod 600 ~/.secrets/certbot/cloudflare.ini
$ ls -la ~/.secrets/certbot/cloudflare.ini
-rw——- 1 user user 60 Jun 21 00:00 /home/user/.secrets/certbot/cloudflare.ini
③「DNS problem: NXDOMAIN」— TXT レコードが伝播していない
TXT レコードを Cloudflare に書いても DNS の伝播(プロパゲーション)に時間がかかる場合があります。--dns-cloudflare-propagation-seconds 60 オプションで待機時間を延ばせます(デフォルトは10秒)。
–dns-cloudflare \
–dns-cloudflare-credentials ~/.secrets/certbot/cloudflare.ini \
–dns-cloudflare-propagation-seconds 60 \
-d “*.example.com” -d “example.com” \
–email your@email.com –agree-tos -n
④ Nginx / Apache への反映を忘れる
更新が成功しても Nginx・Apache のリロードをしないと古い証明書のまま動き続けます。/etc/letsencrypt/renewal-hooks/deploy/ にスクリプトを置けば、更新成功後に自動でリロードできます。
#!/bin/bash
systemctl reload nginx
$ sudo chmod +x /etc/letsencrypt/renewal-hooks/deploy/reload-nginx.sh
まとめ
- ワイルドカード証明書は DNS-01 チャレンジが必須。HTTP-01 では取得できない
- Ubuntu 24.04 では
apt install certbot python3-certbot-dns-cloudflareで一発インストール - certbot のバージョンは Ubuntu 22.04 が 1.21.0、24.04 が 2.9.0。機能は両方 ACME v2 対応
- 認証情報ファイル(
.ini)のパーミッションは必ず600に systemctl enable --now certbot.timerで1日2回の自動更新が動く- 更新後のリロードは
renewal-hooks/deploy/で自動化できる
VPS を複数台運用していると、証明書管理が手間になりがちです。DNS-01 + certbot.timer の組み合わせで、ワイルドカード証明書を一度設定すれば、あとは自動更新に任せられます。Vultr や DigitalOcean でサーバーを借りている場合、DNS を Cloudflare に向けておくとこの構成がそのまま使えます。
関連記事:Ubuntu で Nginx + Let’s Encrypt を設定する(入門)
コメント