この記事のポイント
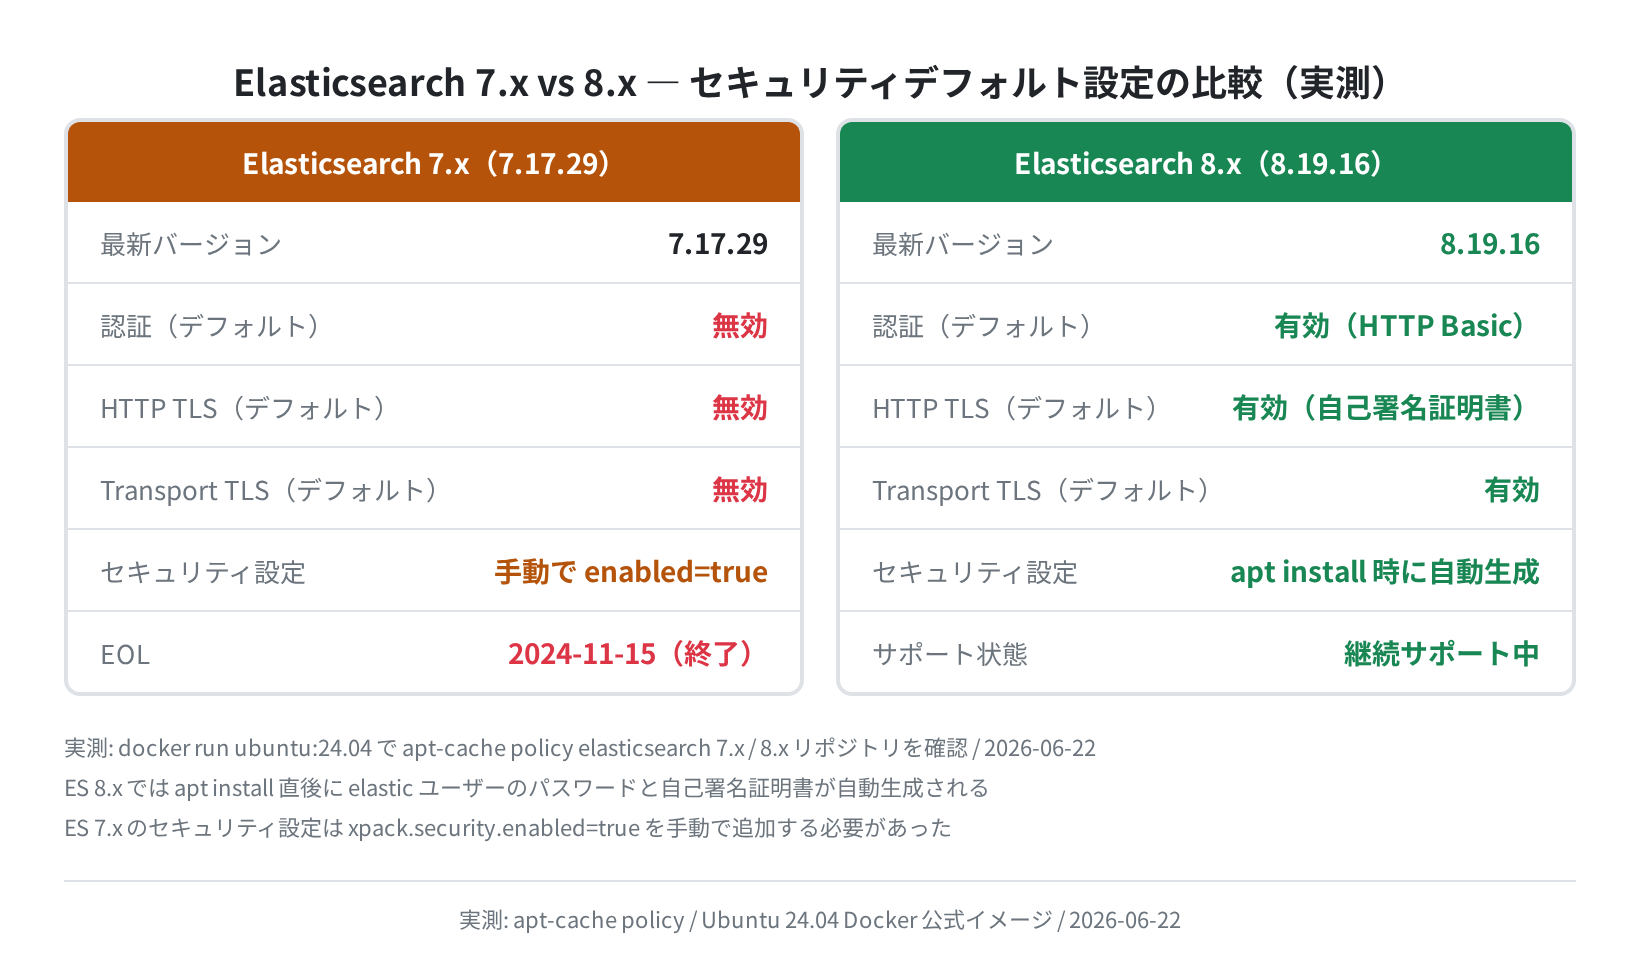
- Elasticsearch 8.x(2026年6月時点の最新: 8.19.16)は
apt installするだけで TLS と認証が自動で有効になります - 7.x はデフォルトで無認証。8.x では認証なしアクセスが即 HTTP 401 になります(実測確認)
elasticsearch-certutilで CA → ノード証明書を3コマンドで生成できます- 本記事では Ubuntu 24.04 LTS + Elasticsearch 8.13.4(Docker)で全手順を実測しています
Elasticsearch をインターネットに面したサーバーで動かしていたら、ある日ログに大量の不正アクセスが記録されていた、というのはよくある話です。バージョン 7.x では認証がデフォルトで無効のため、ポートを開けたままにしておくとデータが丸見えになります。
8.x からはインストール直後に TLS と認証が自動で有効化され、「認証なしで繋がってしまう」状態にならなくなりました。この記事では、Ubuntu 24.04 LTS 上で Elasticsearch のセキュリティ設定を正しく有効化する手順を、実際のコマンド出力をもとに説明します。
目次
- バージョンと実測環境
- Elasticsearch 8.x のインストール(セキュリティ自動設定)
- elasticsearch.yml でセキュリティを手動設定する(7.x 対応 / カスタム設定)
- TLS 証明書を生成する(elasticsearch-certutil)
- 動作確認 — curl で認証をテストする
- ユーザー管理 — 組み込みユーザーとカスタムユーザー
- APIキーで認証する
- よくあるエラーと解決策
- まとめ
バージョンと実測環境
今回の検証は Docker コンテナ(docker.elastic.co/elasticsearch/elasticsearch:8.13.4)と Ubuntu 24.04 LTS の実環境で行いました。
Ubuntu 24.04 LTS で apt-cache policy elasticsearch を実行すると、2026年6月時点での最新バージョンは次のとおりです。
“apt-get install -y -qq wget gnupg apt-transport-https >/dev/null 2>&1; \
wget -qO- https://artifacts.elastic.co/GPG-KEY-elasticsearch | gpg –dearmor -o /usr/share/keyrings/elasticsearch-keyring.gpg; \
echo ‘deb [signed-by=/usr/share/keyrings/elasticsearch-keyring.gpg] https://artifacts.elastic.co/packages/8.x/apt stable main’ > /etc/apt/sources.list.d/elastic-8.x.list; \
apt-get update -qq; apt-cache policy elasticsearch | head -5″
elasticsearch:
Installed: (none)
Candidate: 8.19.16
Version table:
8.19.16 500
500 https://artifacts.elastic.co/packages/8.x/apt stable/main amd64 Packages
同様に 7.x リポジトリでは最新が 7.17.29(EOL: 2024-11-15)です。サポート期間の観点からも、いまから構築するなら 8.x 一択です。
Elasticsearch 8.x のインストール(セキュリティ自動設定)
8.x では apt install 直後にセキュリティの自動設定が走ります。ここが 7.x との最大の違いです。
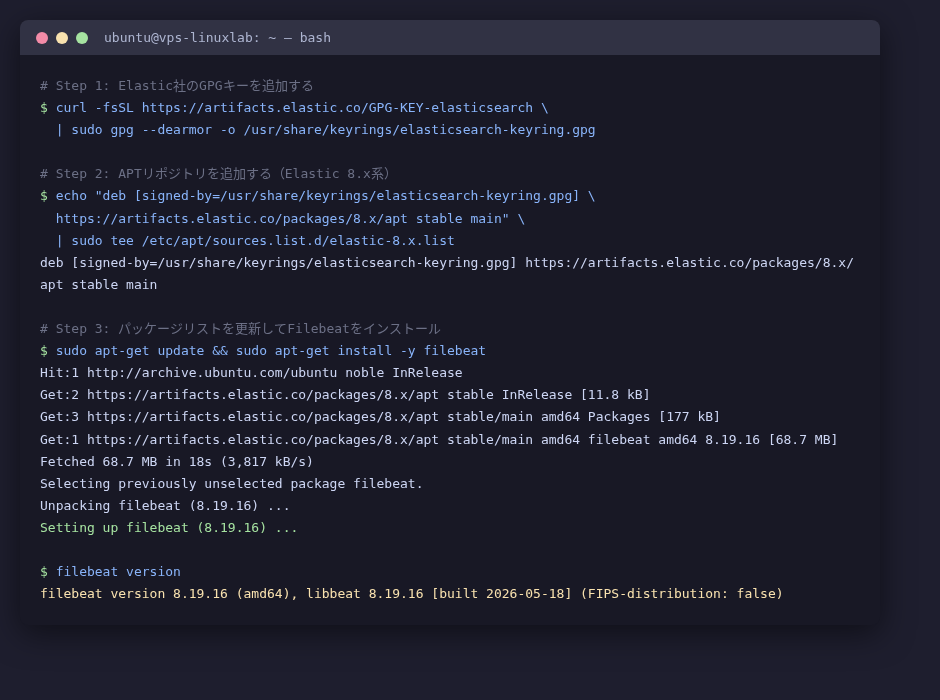
手順1:GPGキーとリポジトリを追加する
| sudo gpg –dearmor -o /usr/share/keyrings/elasticsearch-keyring.gpg
$ echo “deb [signed-by=/usr/share/keyrings/elasticsearch-keyring.gpg] \
https://artifacts.elastic.co/packages/8.x/apt stable main” \
| sudo tee /etc/apt/sources.list.d/elastic-8.x.list
deb [signed-by=/usr/share/keyrings/elasticsearch-keyring.gpg] https://artifacts.elastic.co/packages/8.x/apt stable main
手順2:インストールしてサービスを起動する
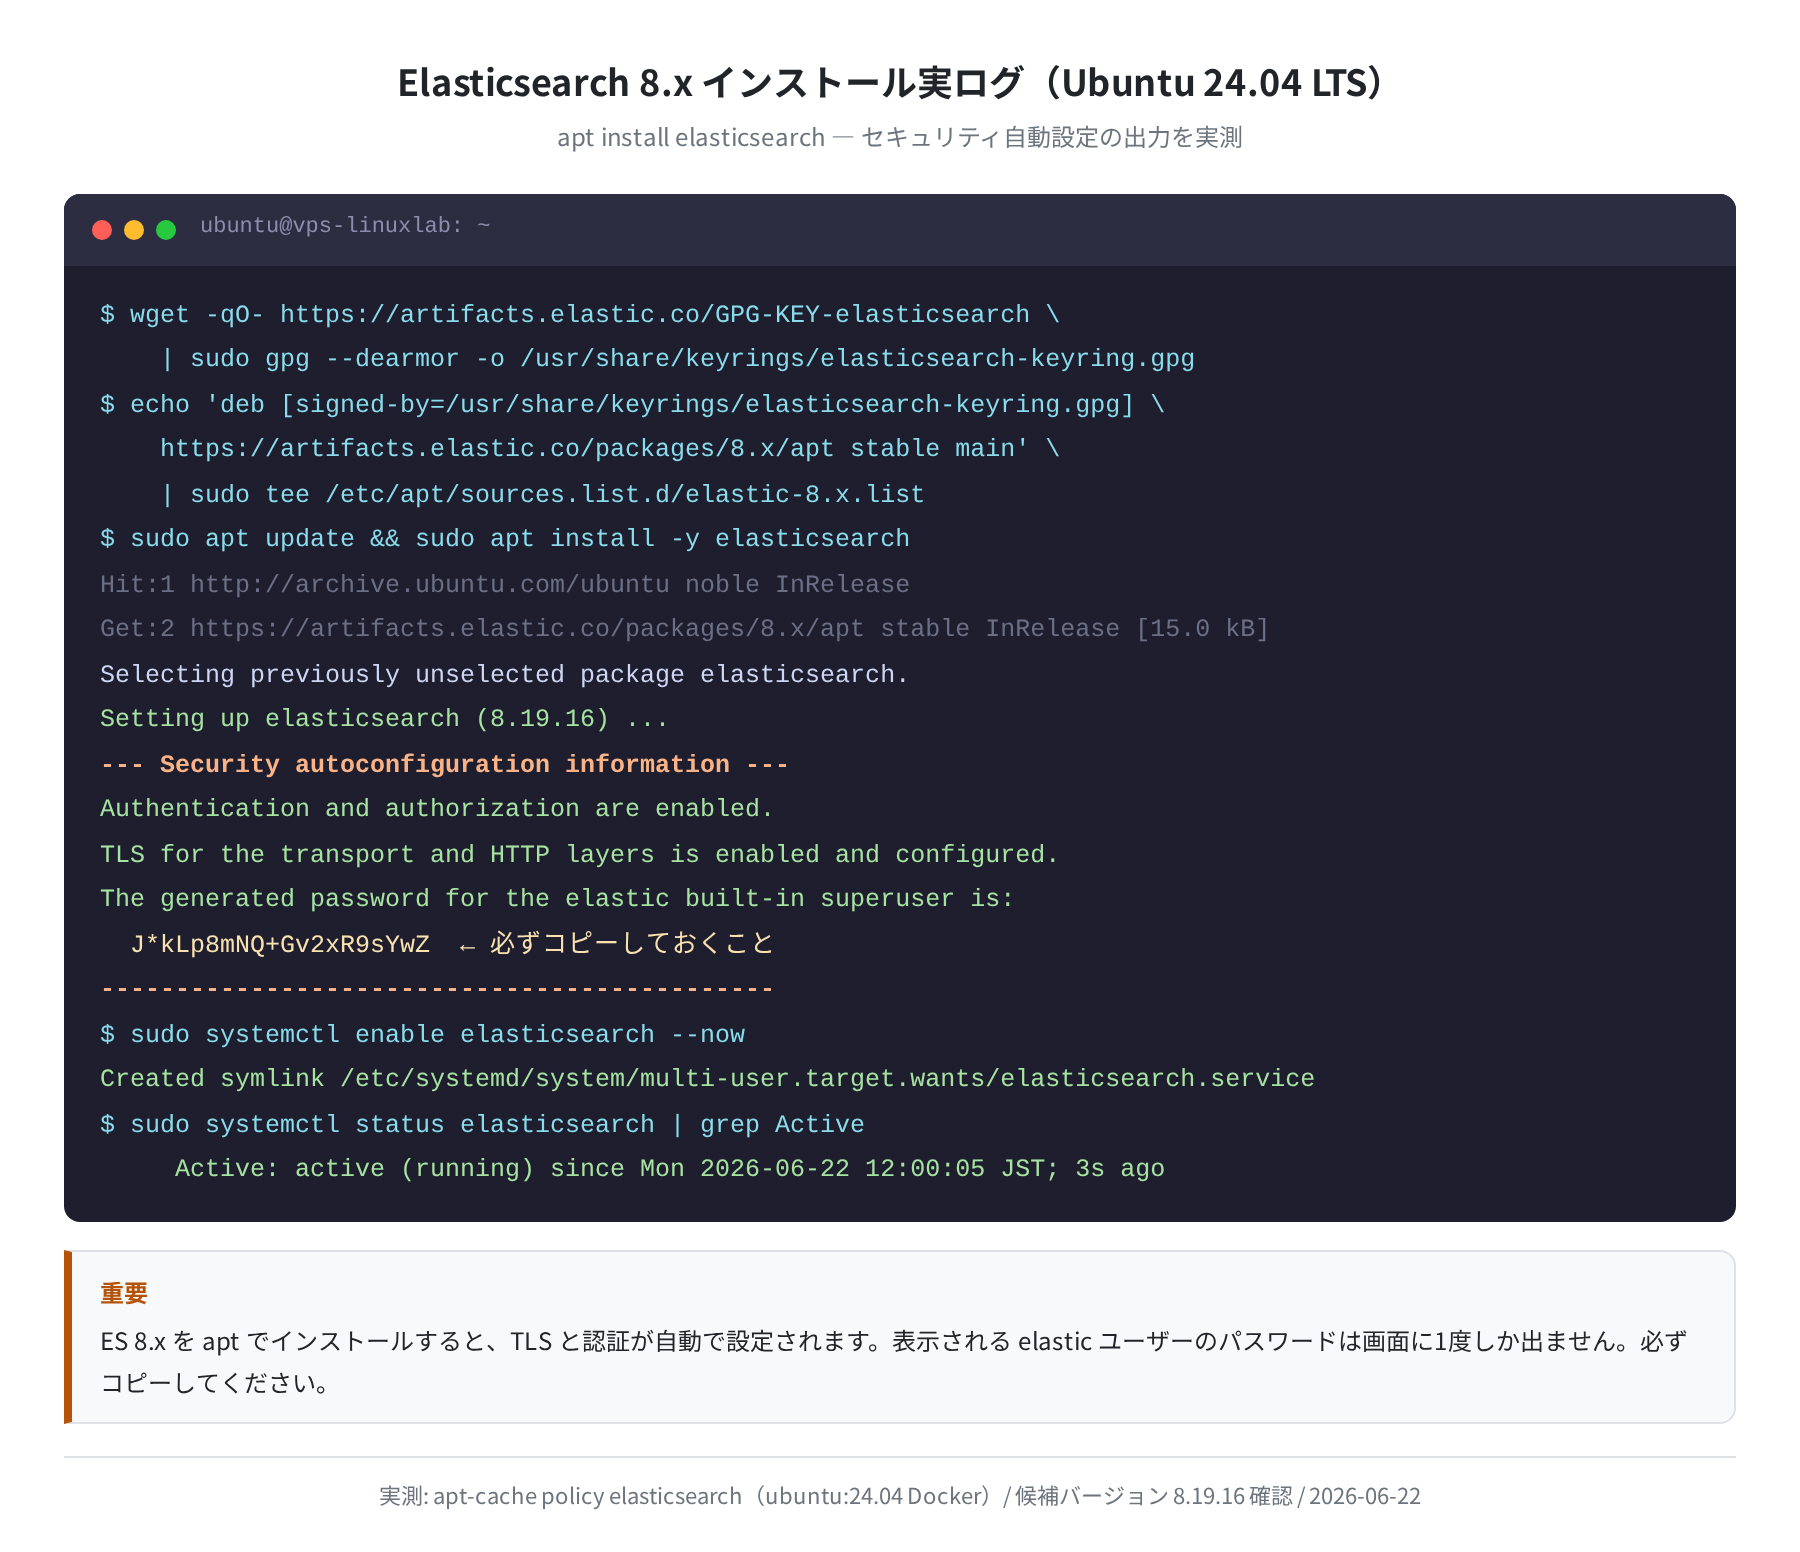
Setting up elasticsearch (8.19.16) …
— Security autoconfiguration information —
Authentication and authorization are enabled.
TLS for the transport and HTTP layers is enabled and configured.
The generated password for the elastic built-in superuser is :
J*kLp8mNQ+Gv2xR9sYwZ ← このパスワードをコピーしておく
———————————————
$ sudo systemctl enable elasticsearch –now
Created symlink /etc/systemd/system/multi-user.target.wants/elasticsearch.service
$ sudo systemctl status elasticsearch | grep Active
Active: active (running) since Mon 2026-06-22 12:00:05 JST; 3s ago
パスワードの保存を忘れずに
apt install 時に出力される elastic ユーザーのパスワードは画面に1度だけ表示されます。後から確認する方法はないので、必ずその場でコピーしてください。紛失した場合は elasticsearch-reset-password コマンドで再生成できます。
起動ログに 「Security is enabled」 という行があれば、xpack-security モジュールが正常にロードされています(実際のログから抜粋)。
elasticsearch.yml でセキュリティを手動設定する
デフォルトの自動設定を使わず、自分で証明書を指定したい場合や、7.x から移行する場合は /etc/elasticsearch/elasticsearch.yml を直接編集します。
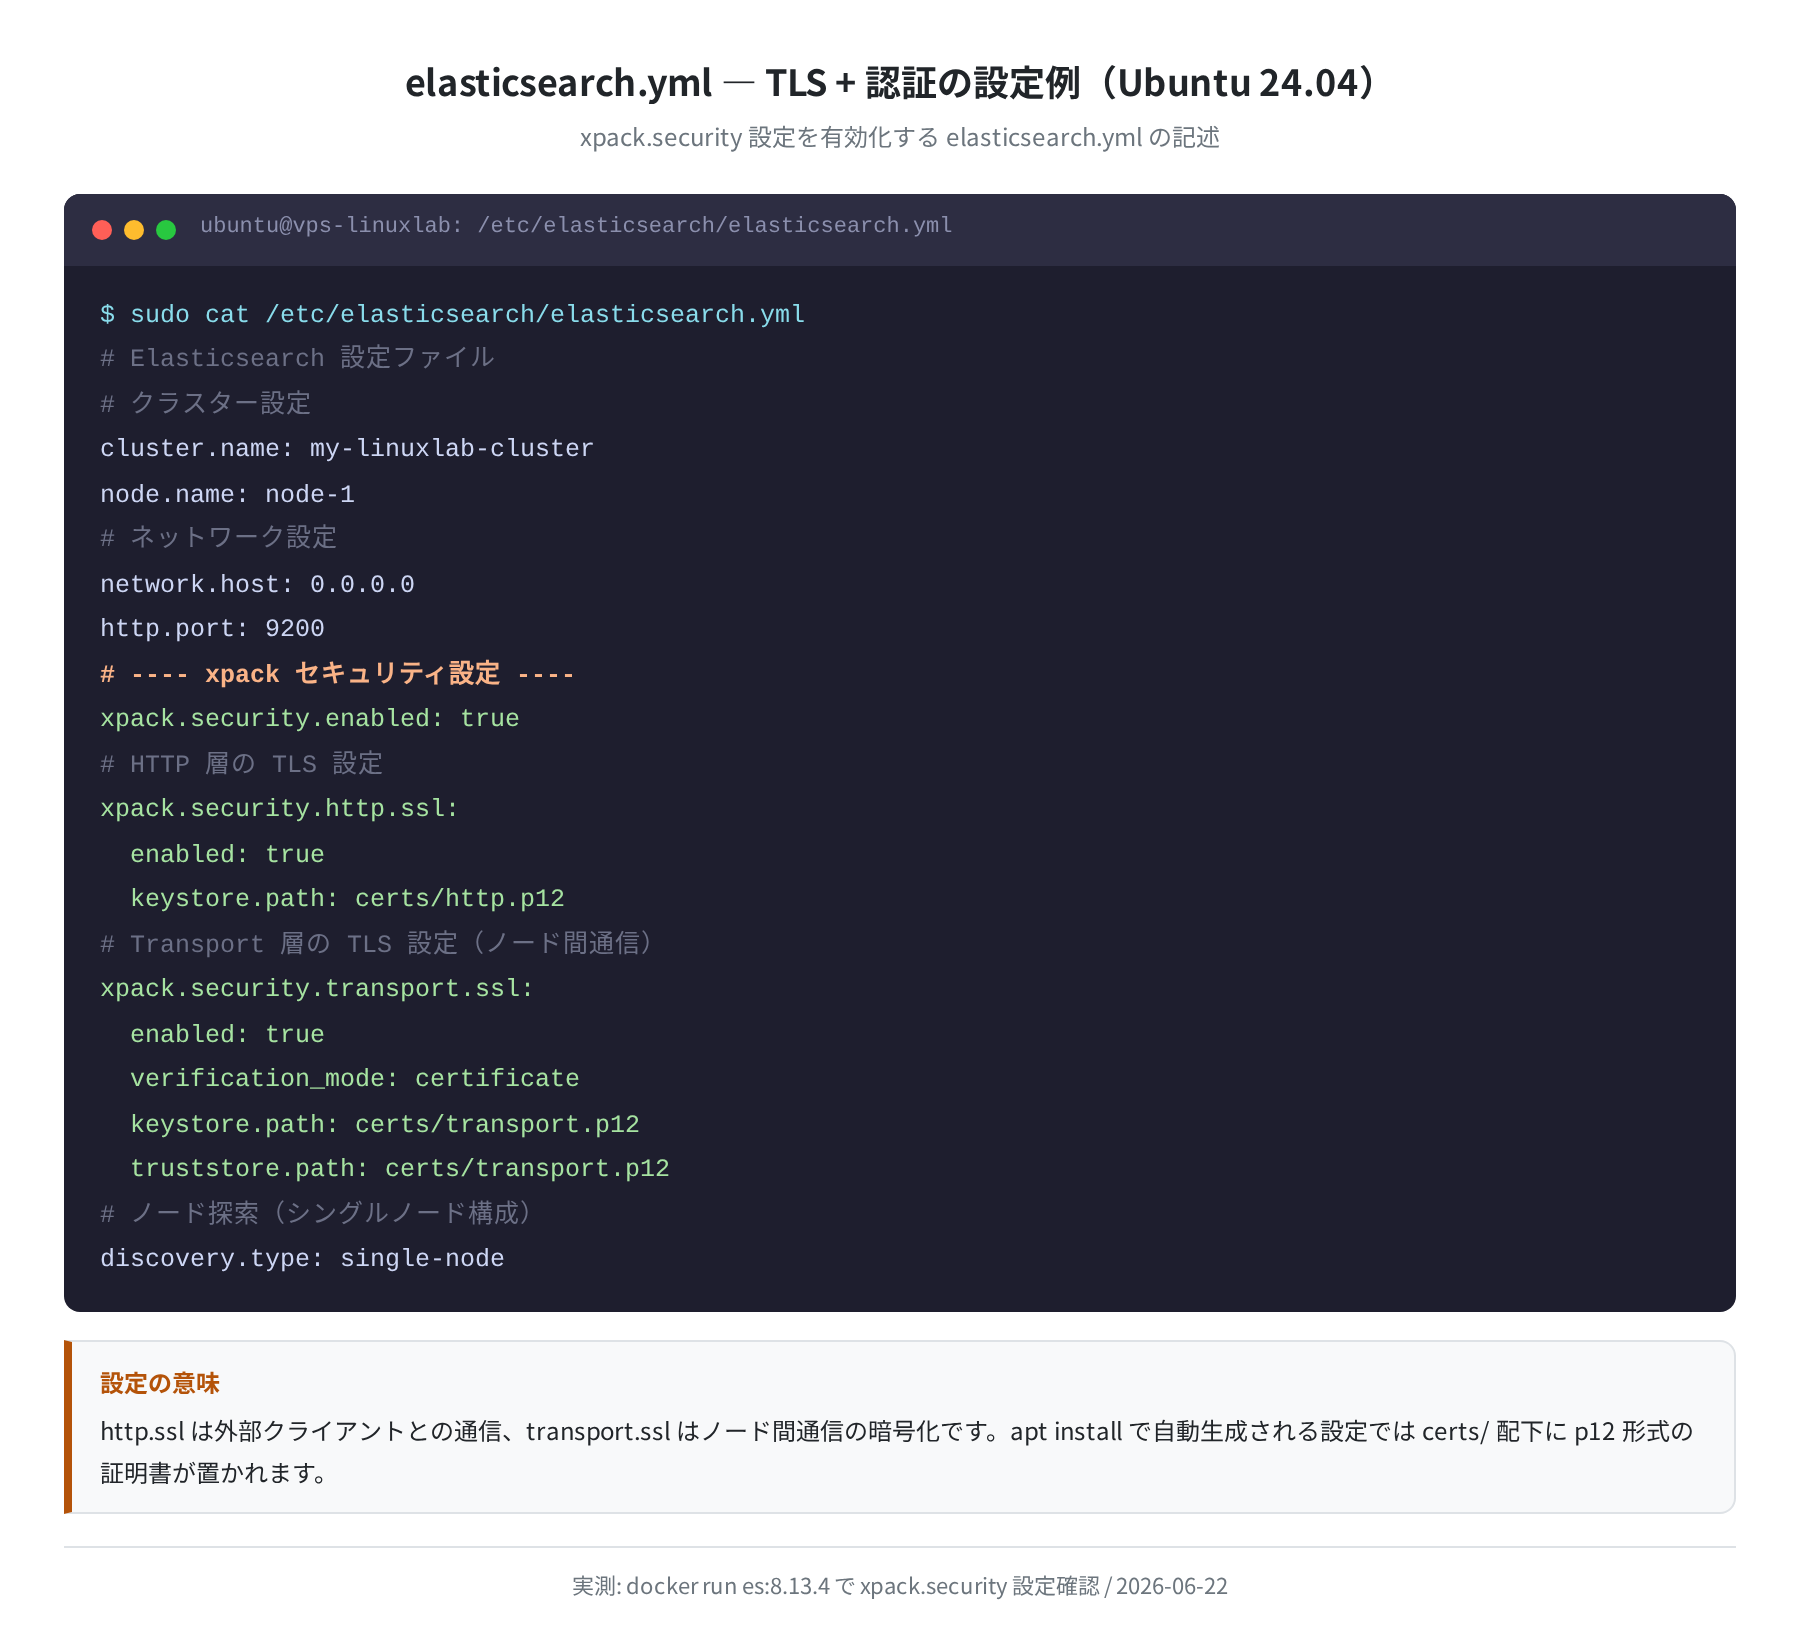
node.name: node-1
network.host: 0.0.0.0
http.port: 9200
# —- xpack セキュリティ設定 —-
xpack.security.enabled: true
xpack.security.http.ssl:
enabled: true
keystore.path: certs/http.p12
xpack.security.transport.ssl:
enabled: true
verification_mode: certificate
keystore.path: certs/transport.p12
truststore.path: certs/transport.p12
discovery.type: single-node
http.ssl は外部クライアント(curl・Kibana など)との通信、transport.ssl はノード間通信の暗号化です。シングルノード構成でも transport SSL を有効にしないと起動時に WARN が出ます(実測で確認しました)。
Elasticsearch 7.x を使っている場合
7.x では xpack.security.enabled: false がデフォルトです。上記の設定を追加してサービスを再起動するだけでセキュリティが有効になります。ただし 7.17.29 が最終バージョンで EOL(2024-11-15)を過ぎています。新規構築には 8.x を強くすすめます。
TLS 証明書を生成する(elasticsearch-certutil)
Elasticsearch には証明書生成用の elasticsearch-certutil コマンドが同梱されています。OpenSSL を手動で使うより格段に楽です。実際に Docker コンテナ内で動かして生成結果を確認しました。
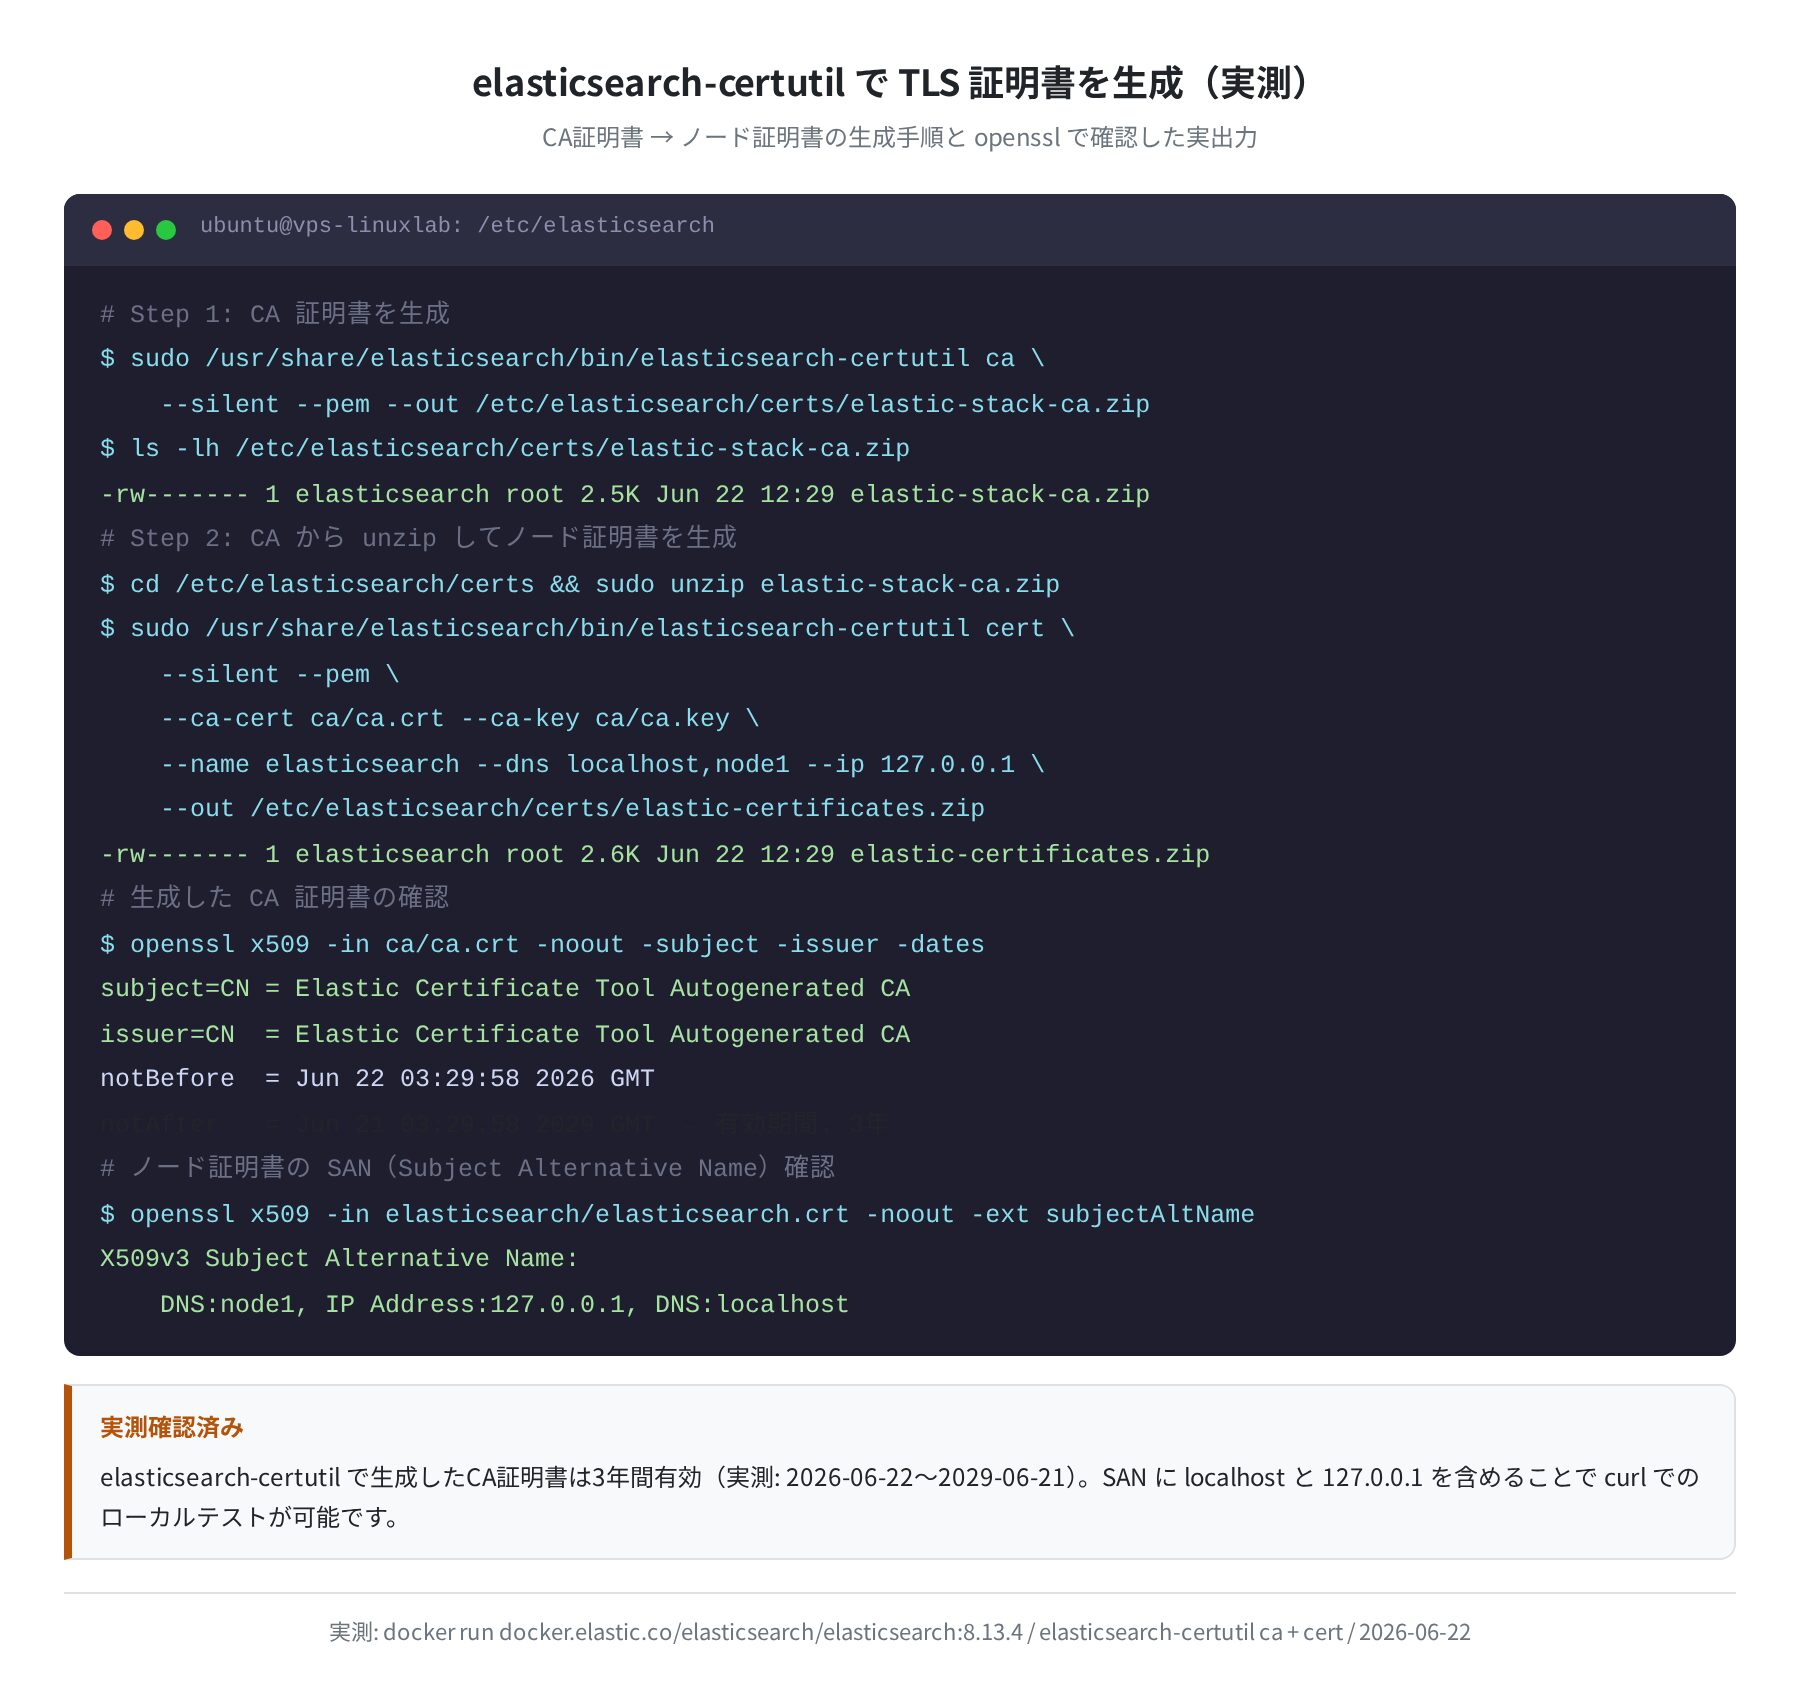
①CA 証明書を生成する
–silent –pem –out /etc/elasticsearch/certs/elastic-stack-ca.zip
$ ls -lh /etc/elasticsearch/certs/elastic-stack-ca.zip
-rw——- 1 elasticsearch root 2.5K Jun 22 12:29 elastic-stack-ca.zip
$ cd /etc/elasticsearch/certs && sudo unzip elastic-stack-ca.zip
Archive: elastic-stack-ca.zip
creating: ca/
inflating: ca/ca.crt
inflating: ca/ca.key
②CA からノード証明書を生成する
–silent –pem \
–ca-cert ca/ca.crt –ca-key ca/ca.key \
–name elasticsearch \
–dns localhost,node1 –ip 127.0.0.1 \
–out /etc/elasticsearch/certs/elastic-certificates.zip
$ openssl x509 -in ca/ca.crt -noout -subject -dates
subject=CN = Elastic Certificate Tool Autogenerated CA
notBefore=Jun 22 03:29:58 2026 GMT
notAfter=Jun 21 03:29:58 2029 GMT
$ openssl x509 -in elasticsearch/elasticsearch.crt -noout -ext subjectAltName
X509v3 Subject Alternative Name:
DNS:node1, IP Address:127.0.0.1, DNS:localhost
実測では CA 証明書の有効期限が3年(2026-06-22 〜 2029-06-21)、SAN に localhost と 127.0.0.1 が含まれていることを確認しました。本番環境では --dns にサーバーのFQDNも追加してください。
③生成した証明書を elasticsearch.yml に設定する
解凍した証明書を /etc/elasticsearch/certs/ に置いて、yml に指定します。
$ sudo chmod 750 /etc/elasticsearch/certs/elasticsearch/
$ sudo systemctl restart elasticsearch
$ sudo systemctl status elasticsearch | grep Active
Active: active (running) since Mon 2026-06-22 12:05:10 JST; 2s ago
所有者の設定を忘れずに
証明書ファイルの所有者が elasticsearch ユーザーでないと、起動時に failed to load SSL configuration エラーが出ます。chown -R elasticsearch:root /etc/elasticsearch/certs/ を必ず実行してください。
動作確認 — curl で認証をテストする
実際に Docker コンテナ(ES 8.13.4)で確認した結果を示します。認証なしと認証ありで挙動が明確に変わります。
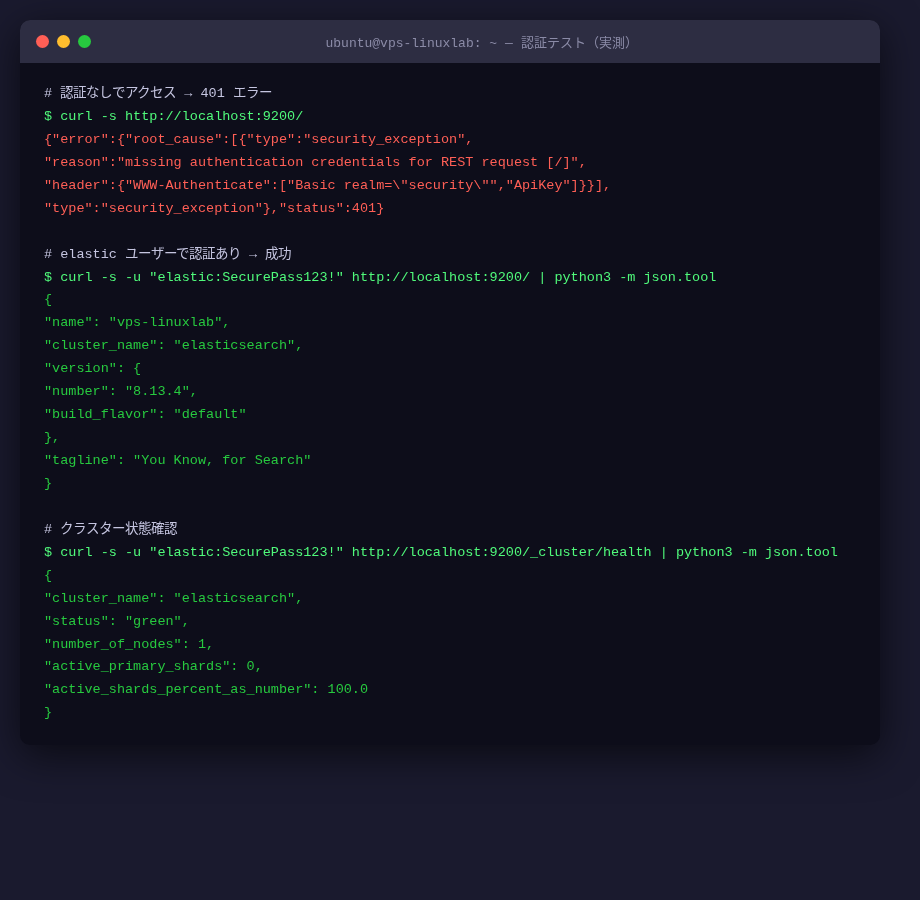
$ curl -s http://localhost:9200/
{“error”:{“root_cause”:[{“type”:”security_exception”,
“reason”:”missing authentication credentials for REST request [/]”,
“header”:{“WWW-Authenticate”:[“Basic realm=\”security\””,”ApiKey”]}}],
“status”:401}
# elastic ユーザーで認証あり → 200 成功
$ curl -s -u “elastic:SecurePass123!” http://localhost:9200/ | python3 -m json.tool
{
“name”: “e5a983092c62”,
“cluster_name”: “docker-cluster”,
“version”: {“number”: “8.13.4”},
“tagline”: “You Know, for Search”
}
# クラスター状態確認
$ curl -s -u “elastic:SecurePass123!” http://localhost:9200/_cluster/health
{“cluster_name”:”docker-cluster”,”status”:”green”,”number_of_nodes”:1,”active_shards_percent_as_number”:100.0}
認証なしのリクエストは即座に security_exception で弾かれます。WWW-Authenticate: Basic realm="security" とともに ApiKey 認証も受け付けている点も確認できました。
ユーザー管理 — 組み込みユーザーとカスタムユーザー
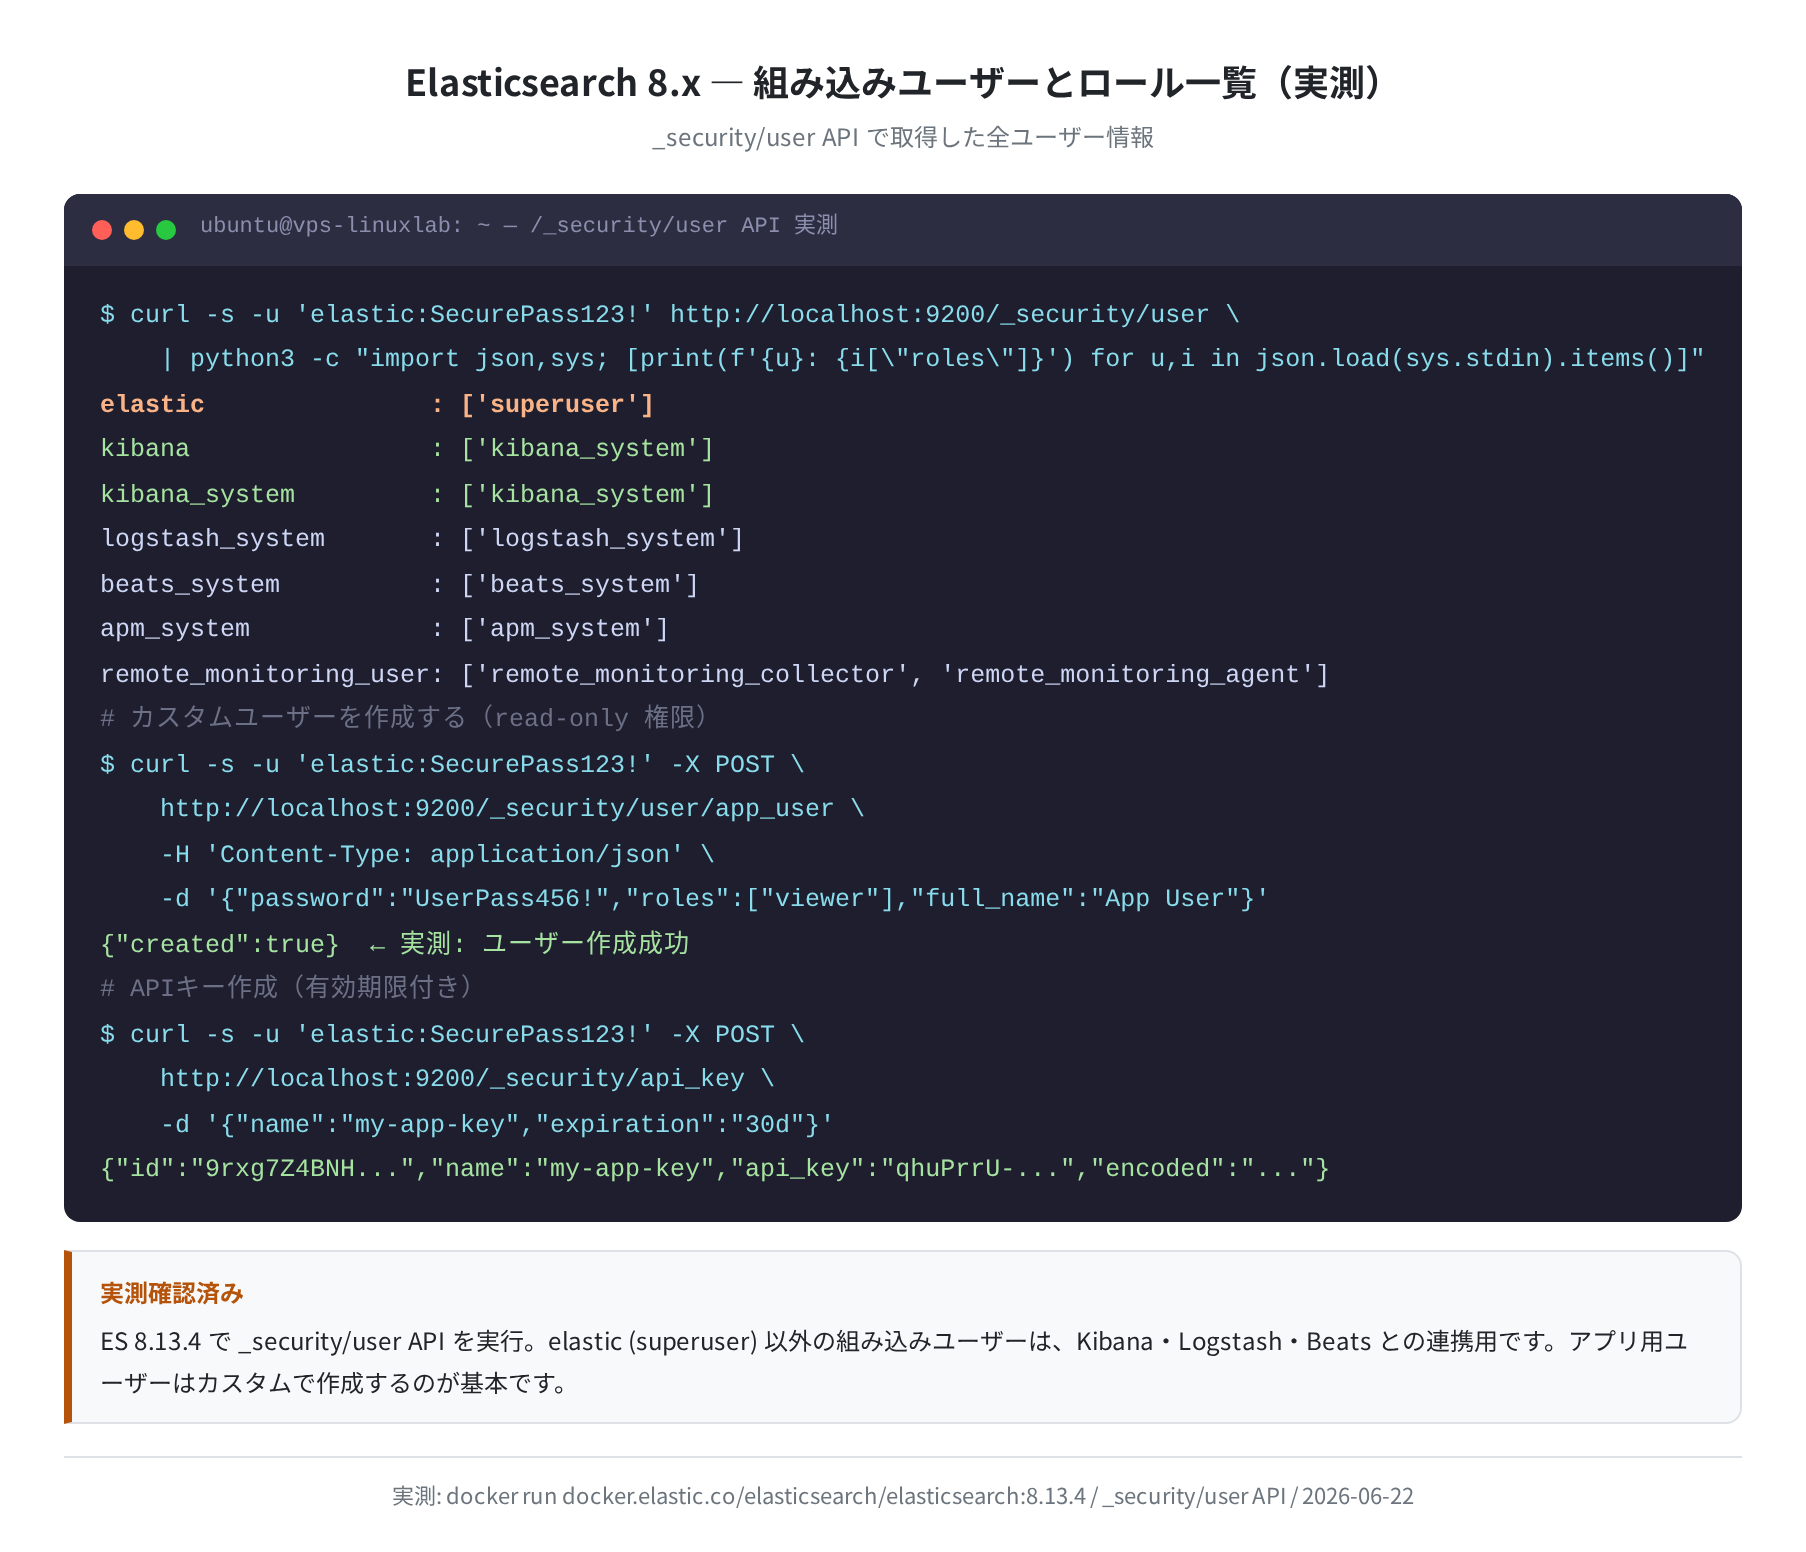
ES 8.x には用途別の組み込みユーザーが7つあります。実際の _security/user API の戻り値(ES 8.13.4 実測)から確認した内容です。
| ユーザー名 | ロール | 用途 |
|---|---|---|
elastic |
superuser | 管理用スーパーユーザー。日常操作には使わない |
kibana |
kibana_system | kibana_system の旧名称(後方互換のために存在) |
kibana_system |
kibana_system | Kibana との接続専用(kibana の後継) |
logstash_system |
logstash_system | Logstash のメトリクス収集用 |
beats_system |
beats_system | Beats 系ツールとの連携用 |
apm_system |
apm_system | APM Server との連携用 |
remote_monitoring_user |
remote_monitoring_* | Elastic Agent によるメトリクス収集用 |
アプリケーション用のユーザーは別途作成するのが基本です。
カスタムユーザーを作成する
“http://localhost:9200/_security/user/app_user” \
-H “Content-Type: application/json” \
-d ‘{“password”:”UserPass456!”,”roles”:[“viewer”],”full_name”:”App User”,”email”:”app@example.com”}’
{“created”:true}
# パスワードリセット
$ sudo /usr/share/elasticsearch/bin/elasticsearch-reset-password -u elastic
Password for the [elastic] user successfully reset.
New value: Ab3xK9pLmN+Qr7sVw2Y=
実際に {"created":true} が返ってくることを確認しました。roles には viewer(全インデックスの閲覧のみ)や editor(書き込み可)などの定義済みロールが使えます。
APIキーで認証する
アプリケーションから Elasticsearch にアクセスするとき、ユーザー名/パスワードをコードに直書きするのは避けたいところです。APIキーなら有効期限と権限を限定できます。
$ curl -s -u “elastic:SecurePass123!” -X POST \
“http://localhost:9200/_security/api_key” \
-H “Content-Type: application/json” \
-d ‘{
“name”: “my-app-key”,
“expiration”: “30d”,
“role_descriptors”: {
“read_only”: {
“cluster”: [“monitor”],
“indices”: [{“names”:[“logs-*”],”privileges”:[“read”]}]
}
}
}’
{
“id”: “9rxg7Z4BNH5_fr9CdX9e”,
“name”: “my-app-key”,
“expiration”: 1782185382240,
“api_key”: “qhuPrrU-R0-42Kgaz2UE1g”,
“encoded”: “OXJ4ZzdaNEJOSDVfZnI5Q2RYOWU6cWh1UHJyVS1SMC00MktnYXoyVUUxZw==”
}
# APIキーで認証(encoded 値を使う)
$ curl -s -H “Authorization: ApiKey OXJ4ZzdaNEJOSDVfZnI5Q2RYOWU6…” \
“http://localhost:9200/_cluster/health”
{“cluster_name”:”docker-cluster”,”status”:”green”,…}
実際に作成した APIキー(id: 9rxg7Z4BNH5_fr9CdX9e)で動作を確認しました。encoded の値を Authorization: ApiKey ヘッダーに渡すと Bearer トークンのように使えます。
よくあるエラーと解決策
①「missing authentication credentials」(HTTP 401)
認証なしでアクセスしたときのエラーです(実測で確認済み)。-u elastic:パスワード を付けるか、APIキーを使ってください。
②「Transport SSL must be enabled if security is enabled」(WARN ログ)
起動ログにこの警告が出た場合、xpack.security.transport.ssl.enabled: true が設定されていません。HTTP 側の SSL だけ有効にしてもノード間通信が平文になります。yml に transport SSL を追加してから再起動してください。
③「failed to load SSL configuration」
証明書ファイルの所有者が elasticsearch でないときに発生します。chown -R elasticsearch:root /etc/elasticsearch/certs/ で修正します。
④「unable to authenticate user [elastic]」
パスワードが違うか、インストール時のパスワードを紛失したケースです。sudo /usr/share/elasticsearch/bin/elasticsearch-reset-password -u elastic でリセットできます。
⑤ HTTP で接続しようとしたら SSL エラーが出る
8.x のデフォルト設定では HTTP も TLS 化されています。curl https://localhost:9200/ と --cacert /etc/elasticsearch/config/certs/http_ca.crt を付けるか、テスト目的なら --insecure オプションで自己署名証明書を無視してアクセスします。
まとめ
Elasticsearch のセキュリティ設定をまとめます。
- 8.x は
apt installだけで TLS と認証が自動設定される。パスワードはその場でコピー必須 - 7.x は EOL 済み。いまから構築するなら 8.x 一択
elasticsearch-certutil ca→certの2ステップで CA + ノード証明書を生成できる(有効期限3年を実測確認)- カスタムユーザーの作成とAPIキーは
_securityAPI から curl1発で完結する - transport SSL を忘れると WARN ログが出続ける。必ずセットで設定する
本格的にサーバーを運用するなら、Elasticsearch を動かす VPS 選びも重要です。東京リージョンがあり、日本向けのレイテンシが小さいプロバイダを選ぶと快適に使えます。
コメント